Debugging Python HTTP(S) Requests
Debugging Python HTTP Requests
Due to the nature of my work, I often end up working with various HTTP APIs. While many are incredibly well documented and are clear and intuitive, sometimes that just isn’t the case. Often at this point I need to inspect what an SDK in a different language is doing. Other times I’m sure I’ve got it right, but perhaps I’ve missed an encoding step somewhere and my request is slightly incorrect. Either way, the best way to debug is often to look at the raw HTTP request I’m sending (or even the response I recieve).
One of the simplest ways of doing this is when you are using the requests library. I use this snippet for debugging quite often:
def raw_request(request: requests.Request) -> str:
    request = request.prepare()
    output = f"{request.method} {request.path_url} HTTP/1.1\r\n"
    output += '\r\n'.join(f'{k}: {v}' for k, v in request.headers.items())
    output += "\r\n\r\n"
    if request.body is not None:
        output += request.body.decode() if isinstance(request.body, bytes) else request.body
    return output
To use it, do the following:
request = requests.Request("POST", "https://example.com", json={"Hello": "World"})
print(raw_request(request))
You’ll see a raw HTTP request that looks something like:
POST / HTTP/1.1
Content-Length: 18
Content-Type: application/json

{"Hello": "World"}
Now, of course, this depends on the internals of requests never changing. It also means that you need to be in control of creating the request. What about the times when you aren’t?
Debugging Proxies
A “debugging proxy” is a web proxy which logs the HTTP(S) traffic between your computer and the rest of the world. With these logs, you can then inspect the requests made and figure out where/if things are going wrong.
Some options for debugging proxies are:
| Name | Windows | Mac | Linux |
|---|---|---|---|
| Wireshark | ✅ | ✅ | ✅ |
| Fiddler | ✅ | ||
| Charles | ✅ | ||
| Burp Suite | ✅ | ✅ | ✅ |
| HTTP Toolkit | ✅ | ✅ | ✅ |
Personally, I tend to use Fiddler on Windows most of the time, but on a Mac I’ll use Charles. Wireshark can do everything, but with that comes a huge amount of complexity that I find is overkill for HTTP debugging. Particularly when it comes to debugging TLS encrypted sessions.
Choose whichever one you want and fire it up. Now, all you need to do is set a couple of environment variables and you’ll be debugging your requests in no time.
Sending Requests
To tell the libraries to use the proxy rather than send the requests directly to the desired server, you need to set some environment variables. These are http_proxy, HTTP_PROXY, https_proxy, and HTTPS_PROXY.
Every tool will use its own port for the proxy, but it’s usually 8888, 8080, or 8000 by default.
If we use Fiddler, which is on port 8888, as an example you’d set these environment variables as follows:
http_proxy=http://127.0.0.1:8888
HTTP_PROXY=http://127.0.0.1:8888
https_proxy=http://127.0.0.1:8888
HTTPS_PROXY=http://127.0.0.1:8888
Note, you can also do this in your Python code:
proxy = 'http://127.0.0.1:8888'
os.environ['http_proxy'] = proxy
os.environ['HTTP_PROXY'] = proxy
os.environ['https_proxy'] = proxy
os.environ['HTTPS_PROXY'] = proxy
Now, open up Python and make a request:
import requests

response = requests.get("http://example.com")
print(response.text)
You’ll get a lovely stream of HTML coming back. If you look in your tool (again using Fiddler as an example), you can see the following:

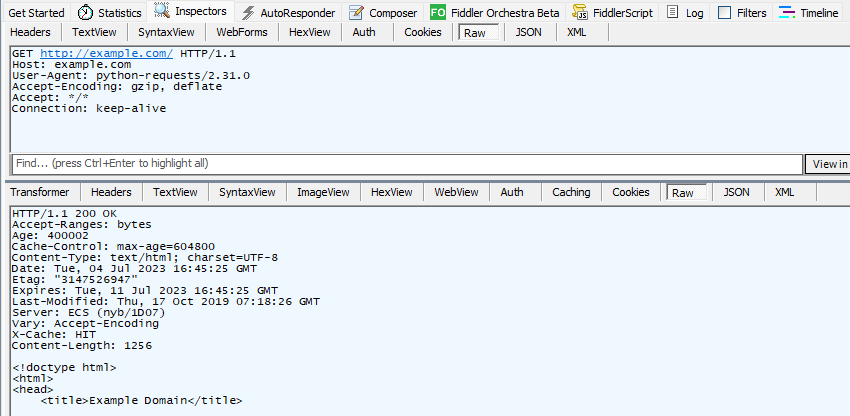
And if we look at the inspectors, we can see the request sent at the top, and the response recieved at the bottom:

There’s a problem though. Try again with this code:
import requests

response = requests.get("https://example.com") # Note the 'https'
print(response.text)
This time you’ll get an SSL error. Since the proxy is in the middle, it’s trying to decode the request you send (you may have to turn this feature on in your proxy) so it can display it, before then forwarding on to example.com. However, the library has correctly realised that your connection is not secure any longer and throws an exception.
Root Certificates
These tools generate their own root certificates and use those when forwarding the requests. If our tools are told about these certificates, and that they can be trusted, then we can make TLS encrypted requests and the proxy will be able to debug and display them.
To do this, we first need to export the certificate from our tool. With Fiddler, you can get it from a link by visiting http://127.0.0.1:8888. For Burp Suite, you open the tool, visit the “Proxy” tab, and select “Import / export CA certificate”. Other tools have similar mechanisms.
Now, we need to convert this certificate into the PEM format. Depending on the tool, how it exported it, and the OS you are on, the instructions here will vary. Generally searching for “Convert [ext] into PEM on [OS]” will get you what you need.
Once you have your root certificate as a PEM file, you just need to tell the various tools about it with yet another environment variable. requests uses one called REQUESTS_CA_BUNDLE. httplib2 uses HTTPLIB2_CA_CERTS. But both just expect a path to the file. e.g.
HTTPLIB2_CA_CERTS="/path/to/cert.pem"
REQUESTS_CA_BUNDLE="/path/to/cert.pem"
Again, this can be done in Python code.
Making a TLS request
Now if we try the code from before:
import requests

response = requests.get("https://example.com")
print(response.text)
You will see the HTML in your console, and the request will appear in your debugger.
Other Features
Viewing HTTP(S) requests and responses is just one small part of what these tools can do. They can be configured to automatically drop certain requests, respond with pre-canned information to others, and even run scripts to process and respond. I’ve even written about Fiddler response rules before. Each tool has different features and capabilities, but when you’ve picked one, it’s well worth knowing what they can do. And obviously, this isn’t limited to Python. Other tools, languages and libraries will be able to be debugged this way. Sometimes you’ll get lucky and they’ll respect the system settings. Other times you’ll need to do what you did here with the environment variables.
