<?xml version="1.0" encoding="utf-8"?><feed xmlns="http://www.w3.org/2005/Atom" ><generator uri="https://jekyllrb.com/" version="3.10.0">Jekyll</generator><link href="https://myers.io/feed.xml" rel="self" type="application/atom+xml" /><link href="https://myers.io/" rel="alternate" type="text/html" /><updated>2026-04-15T23:09:05+01:00</updated><id>https://myers.io/feed.xml</id><title type="html">myers.io</title><subtitle>Dale Myers&apos; blog</subtitle><author><name>Dale Myers</name></author><entry><title type="html">LLMs and the Adversarial Loop</title><link href="https://myers.io/2026/04/15/LLMs-and-the-Adversarial-loop/" rel="alternate" type="text/html" title="LLMs and the Adversarial Loop" /><published>2026-04-15T00:00:00+01:00</published><updated>2026-04-15T00:00:00+01:00</updated><id>https://myers.io/2026/04/15/LLMs-and-the-Adversarial-loop</id><content type="html" xml:base="https://myers.io/2026/04/15/LLMs-and-the-Adversarial-loop/"><![CDATA[<p>LLMs are confident. So much so that if you ask one to give you the recipe to immortality, it will probably take a stab at it, even though it knows as much about mortality as it does its own existence. Ask one to write a design spec and it’ll produce something that reads well, covers the obvious cases, and sounds authoritative. Ask it to implement code from that spec and it’ll write something that compiles and handles the happy path. But that’s as good as it gets.</p>

<p>Trouble is, “reads well” and “is correct” aren’t the same thing. LLMs gloss over edge cases, make assumptions without telling you, and produce code that works for the examples they had in mind but breaks for the ones they didn’t consider. And if you ask an LLM to review its own work? It rubber-stamps it. The same blind spots that caused the problem cause it to miss the problem during review.</p>

<p>The solution? Get a second, independent LLM instance to review instead. It’ll catch things the first one missed.</p>

<p>That’s it. If you want to stop reading, give up here. Wait, actually, not quite: Do the second LLM thing, but do it in a loop until the reviewer is satisfied (or you hit a limit and move on with whatever you’ve got). Ok, now you can give up.</p>

<h2 id="why-this-works">Why This Works</h2>

<p>LLMs are stochastic. Two calls with the same prompt will emphasise different aspects, notice different patterns, and follow different reasoning. That’s not like running a linter twice. A linter finds the same issues every time, so re-running it is pointless. Two independent LLM calls will look at different parts of the output and reach different conclusions.</p>

<p>Self-review (same instance, same session) doesn’t help much either, because the session context anchors the model to its previous reasoning. It’s already committed to certain assumptions and isn’t going to challenge them. A fresh instance starts from scratch, and because of stochastic sampling, it’ll evaluate things differently.</p>

<p>You can think of it as harvesting the variance in LLM outputs. One sample might be good or bad. Multiple independent samples, set up as a create-then-critique cycle, use the differences between them to push toward higher quality.</p>

<h3 id="the-gan-analogy">The GAN Analogy</h3>

<p>The pattern’s borrowed from GANs. Generator produces outputs, discriminator evaluates them, the tension between them drives quality up. The analogy breaks down in the details (GANs converge via gradient descent; the adversarial loop uses heuristics like severity thresholds and iteration caps), but the principle holds: a creator paired with a critic does better than either alone.</p>

<h2 id="how-it-works">How It Works</h2>

<p>Two LLM instances, a “primary” (creator) and an “adversary” (critic), alternate rounds until the work’s good enough.</p>

<h3 id="the-basic-cycle">The Basic Cycle</h3>

<ol>
  <li><em>Primary produces work.</em> Round 1 is the initial output. Later rounds incorporate the adversary’s feedback.</li>
  <li><em>Adversary reviews.</em> It produces structured issues with a category, description, and severity (critical/major/minor), plus an overall verdict: “approved” or “needs work”.</li>
  <li><em>Convergence check.</em> Accept or keep going.</li>
  <li><em>Repeat or exit.</em></li>
</ol>

<p>If the primary and adversary can’t agree (the primary thinks it’s done, the adversary keeps raising issues, or that the primary thinks that the adversary’s issues are not relevant), you’ve got options. The simplest is to let the convergence rules below handle it: cap the rounds, detect stale loops, move on. If you want something smarter, add a 3rd agent to read both sides and make the call.</p>

<h3 id="session-isolation">Session Isolation</h3>

<p>The primary reuses the same session across rounds because it’s building on its own work and needs that context. The adversary gets a fresh session every round.</p>

<p>Why? If the adversary kept its context, it’d anchor to previous findings, assume fixes without checking, and focus on what changed rather than the whole picture. Fresh sessions force it to evaluate on its own merits. And because of stochastic sampling, each round’s adversary is effectively a different reviewer. That’s expensive with humans but trivial with LLMs.</p>

<h3 id="convergence">Convergence</h3>

<p>This is always going to vary by application, but say we want to create a tool to implement various work items, you might say that the round cap is 10 (we’ll call that N).</p>

<p>The loop stops when:</p>

<ul>
  <li><em>The adversary approves.</em> The clean exit.</li>
  <li><em>All remaining issues are minor.</em> Naming conventions and comment wording aren’t worth another round.</li>
  <li><em>No new major issues after round N/2.</em> This is the stale-loop detector. If the adversary keeps raising the same things, the loop’s stuck and continuing just burns budget. Duplicate detection uses fuzzy matching: normalised descriptions compared by word overlap, 80% threshold for longer ones, exact match for anything under 4 words.</li>
  <li><em>Iteration cap.</em> Hard limit at N rounds by default.</li>
</ul>

<p>The number of rounds will vary depending on how accurate you want your results to be. The more rounds, the “better” your result will be. The fewer, the faster you get to a “good enough” answer.</p>

<h3 id="escalation">Escalation</h3>

<p>Should you choose it, the adversary’s prompt can change over time. The exact thresholds should scale with your N, but as an example with N=10: Round 1 is unrestricted: find everything you can. Rounds 2-4 are normal: focus on substantive issues. Round 5+ is escalated: only raise genuinely new things, stop re-raising stuff that’s been addressed.</p>

<p>Without this, the adversary often tends to just repeat itself endlessly. But again, this is subject to tuning.</p>

<h3 id="prior-rounds-context">Prior Rounds Context</h3>

<p>Even though the adversary gets a fresh session, it’s not completely blind. Both agents get a summary of prior rounds: how many issues, what severity, how they were resolved. The last 5 rounds are shown in detail; older ones get collapsed into aggregates so the prompt doesn’t grow forever.</p>

<h2 id="variations">Variations</h2>

<p>While this process was designed for the implementation of tasks / work items, it doesn’t end there.</p>

<p><em>Standard flow</em> is the default for design, work items, and ordering phases. Primary produces, adversary reviews. Nothing fancy.</p>

<p><em>Inverted flow</em> is used for validation and code review. Here the adversary goes first (does the review), then the primary responds to the findings. This makes more sense when review is the natural starting point.</p>

<p><em>User-in-the-loop</em>, in our example, is specific to the design phase. After each adversarial review, the user sees the issues and can steer things (“focus on the auth flow”), accept the spec as-is, or just let the default revision happen.</p>

<p><em>Per-item loops</em> are how implementation is suggested to work. In a tool I created, one of the phases breaks the task down into work items. That phase runs a separate adversarial loop for each work item. If one work item doesn’t converge, it’s still committed. Partial progress on, for example, 5 of 28 items, with success on the other 23, beats perfect progress on 0.</p>

<h2 id="advantages">Advantages</h2>

<p>The obvious one: it catches real bugs. Missing error handling, unvalidated inputs, race conditions, spec ambiguities. The kind of stuff that survives a single LLM pass and ends up in production. These are the bugs that a human developer tends to avoid introducing.</p>

<p>It’s also reasonably cheap. A review round costs roughly the same as the original generation, so 2-3 rounds might double or triple the cost of a phase. Still a lot less than debugging those bugs in production later.</p>

<p>While not enforced by this “schema”, when using a tool that supports it (such as Claude Code), the structured output format is worth calling out too. The adversary can’t just say “this could be better”. It has to produce a concrete issue with a severity. That makes the feedback actionable, so the primary can make targeted fixes instead of vague rewrites.</p>

<p>Fresh sessions give you independence as a structural guarantee, not something you’re hoping for. And the stochastic nature of LLMs (usually treated as a reliability problem) actually helps here. Each round really is a different review, not the same one repeated.</p>

<p>When the loop doesn’t converge, it doesn’t throw the work away. It takes the best output it has and moves on. Some review is better than none.</p>

<h2 id="disadvantages">Disadvantages</h2>

<p>Cost is the big one. Every round is at least two LLM calls. A $2 phase becomes $4-6 with adversarial review. Multiply that across 7 phases and it adds up fast.</p>

<p>Time compounds too. Each round is sequential, so the primary has to finish before the adversary can review, and vice versa. A 3-round loop takes roughly 3x as long. Phases that already run 30-60 minutes can end up taking hours.</p>

<p>The adversary isn’t always right, either. It raises false positives, misses real issues, and sometimes fixates on style when correctness matters more. The primary wastes time “fixing” things that weren’t broken.</p>

<p>Loops stall sometimes. The adversary keeps insisting something’s wrong and the primary can’t or won’t fix it. The stale-loop detector catches this and moves on, but it means exiting with unresolved issues. That’s fine if it’s a naming dispute, less fine if it’s a security hole.</p>

<p>The adversary by default never actually runs anything (but that’s not a hard limit and can be changed based on your implementation). It doesn’t execute code, run tests, or check constraints. It just reads and reasons.</p>

<p>Fresh sessions cut both ways. The adversary might re-raise issues that were genuinely fixed, because it doesn’t remember the previous round. The prior-rounds summary helps, but it’s lossy. More context would reduce wasted rounds but increase bias, so the current design picks independence and accepts some waste.</p>

<p>And convergence doesn’t mean correctness. The adversary might’ve missed something critical entirely. The fuzzy duplicate detection has edge cases. These are heuristics, not proofs.</p>

<h2 id="when-its-worth-it">When It’s Worth It</h2>

<p>Use it when bugs are expensive (production code, user-facing stuff, sensitive data), when the task is complex enough that a single pass will miss things, or when nobody’s around to review. It’s your quality gate for unattended runs.</p>

<p>Skip it when cost is the main constraint, the task is trivial, or you need a rough draft fast and don’t care about polish.</p>

<p>Based on my own experience, this pattern is more than capable of handling large tasks at a fraction of the cost of a regular developer. Just this week I had it implement a change. It took about 20 hours wall time and cost $1000 in tokens. That might sound terrifying and wasteful, but we’d budgeted a month for this task for a single developer. For a developer to match the LLM, they’d have to finish in 2.5 days and be making less than $104k per year. Good luck finding that person. And if they take the budgeted month instead, assuming an average of 21 work days per month, their salary better be below $13k. Not per month. Per year. And that’s just to break even. It ignores the time advantage.</p>

<h2 id="before-i-end">Before I End…</h2>

<p>A quick note of honesty: the adversarial loop improves quality, but it doesn’t prove quality. Convergence is heuristic. The LLM’s output still needed human review and testing before it shipped. That’s true of developer code too, though. Nobody ships without review.</p>

<p>The point isn’t that the loop produces perfect code. It’s that it produces code that’s good enough to review, at a cost and speed that makes it worth trying. And if it saves you even one round of “back to the drawing board”, it’s already paid for itself.</p>]]></content><author><name>Dale Myers</name></author><category term="LLM" /><category term="AI" /><summary type="html"><![CDATA[LLMs are confident. So much so that if you ask one to give you the recipe to immortality, it will probably take a stab at it, even though it knows as much about mortality as it does its own existence. Ask one to write a design spec and it’ll produce something that reads well, covers the obvious cases, and sounds authoritative. Ask it to implement code from that spec and it’ll write something that compiles and handles the happy path. But that’s as good as it gets.]]></summary></entry><entry><title type="html">Debugging Python HTTP(S) Requests</title><link href="https://myers.io/2023/07/04/debugging-python-http-requests/" rel="alternate" type="text/html" title="Debugging Python HTTP(S) Requests" /><published>2023-07-04T00:00:00+01:00</published><updated>2023-07-04T00:00:00+01:00</updated><id>https://myers.io/2023/07/04/debugging-python-http-requests</id><content type="html" xml:base="https://myers.io/2023/07/04/debugging-python-http-requests/"><![CDATA[<h1 id="debugging-python-http-requests">Debugging Python HTTP Requests</h1>

<p>Due to the nature of my work, I often end up working with various HTTP APIs. While many are incredibly well documented and are clear and intuitive, sometimes that just isn’t the case. Often at this point I need to inspect what an SDK in a different language is doing. Other times I’m sure I’ve got it right, but perhaps I’ve missed an encoding step somewhere and my request is slightly incorrect. Either way, the best way to debug is often to look at the raw HTTP request I’m sending (or even the response I recieve).</p>

<p>One of the simplest ways of doing this is when you are using the <a href="https://pypi.org/project/requests/"><code class="language-plaintext highlighter-rouge">requests</code></a> library. I use this snippet for debugging quite often:</p>

<div class="language-python highlighter-rouge"><div class="highlight"><pre class="highlight"><code><span class="k">def</span> <span class="nf">raw_request</span><span class="p">(</span><span class="n">request</span><span class="p">:</span> <span class="n">requests</span><span class="p">.</span><span class="n">Request</span><span class="p">)</span> <span class="o">-&gt;</span> <span class="nb">str</span><span class="p">:</span>
    <span class="n">request</span> <span class="o">=</span> <span class="n">request</span><span class="p">.</span><span class="n">prepare</span><span class="p">()</span>
    <span class="n">output</span> <span class="o">=</span> <span class="sa">f</span><span class="s">"</span><span class="si">{</span><span class="n">request</span><span class="p">.</span><span class="n">method</span><span class="si">}</span><span class="s"> </span><span class="si">{</span><span class="n">request</span><span class="p">.</span><span class="n">path_url</span><span class="si">}</span><span class="s"> HTTP/1.1</span><span class="se">\r\n</span><span class="s">"</span>
    <span class="n">output</span> <span class="o">+=</span> <span class="s">'</span><span class="se">\r\n</span><span class="s">'</span><span class="p">.</span><span class="n">join</span><span class="p">(</span><span class="sa">f</span><span class="s">'</span><span class="si">{</span><span class="n">k</span><span class="si">}</span><span class="s">: </span><span class="si">{</span><span class="n">v</span><span class="si">}</span><span class="s">'</span> <span class="k">for</span> <span class="n">k</span><span class="p">,</span> <span class="n">v</span> <span class="ow">in</span> <span class="n">request</span><span class="p">.</span><span class="n">headers</span><span class="p">.</span><span class="n">items</span><span class="p">())</span>
    <span class="n">output</span> <span class="o">+=</span> <span class="s">"</span><span class="se">\r\n\r\n</span><span class="s">"</span>
    <span class="k">if</span> <span class="n">request</span><span class="p">.</span><span class="n">body</span> <span class="ow">is</span> <span class="ow">not</span> <span class="bp">None</span><span class="p">:</span>
        <span class="n">output</span> <span class="o">+=</span> <span class="n">request</span><span class="p">.</span><span class="n">body</span><span class="p">.</span><span class="n">decode</span><span class="p">()</span> <span class="k">if</span> <span class="nb">isinstance</span><span class="p">(</span><span class="n">request</span><span class="p">.</span><span class="n">body</span><span class="p">,</span> <span class="nb">bytes</span><span class="p">)</span> <span class="k">else</span> <span class="n">request</span><span class="p">.</span><span class="n">body</span>
    <span class="k">return</span> <span class="n">output</span>
</code></pre></div></div>

<p>To use it, do the following:</p>

<div class="language-python highlighter-rouge"><div class="highlight"><pre class="highlight"><code><span class="n">request</span> <span class="o">=</span> <span class="n">requests</span><span class="p">.</span><span class="n">Request</span><span class="p">(</span><span class="s">"POST"</span><span class="p">,</span> <span class="s">"https://example.com"</span><span class="p">,</span> <span class="n">json</span><span class="o">=</span><span class="p">{</span><span class="s">"Hello"</span><span class="p">:</span> <span class="s">"World"</span><span class="p">})</span>
<span class="k">print</span><span class="p">(</span><span class="n">raw_request</span><span class="p">(</span><span class="n">request</span><span class="p">))</span>
</code></pre></div></div>

<p>You’ll see a raw HTTP request that looks something like:</p>

<div class="language-plaintext highlighter-rouge"><div class="highlight"><pre class="highlight"><code>POST / HTTP/1.1
Content-Length: 18
Content-Type: application/json

{"Hello": "World"}
</code></pre></div></div>

<p>Now, of course, this depends on the internals of <code class="language-plaintext highlighter-rouge">requests</code> never changing. It also means that you need to be in control of creating the request. What about the times when you aren’t?</p>

<h2 id="debugging-proxies">Debugging Proxies</h2>

<p>A “debugging proxy” is a web proxy which logs the HTTP(S) traffic between your computer and the rest of the world. With these logs, you can then inspect the requests made and figure out where/if things are going wrong.</p>

<p>Some options for debugging proxies are:</p>

<table>
  <thead>
    <tr>
      <th>Name</th>
      <th>Windows</th>
      <th>Mac</th>
      <th>Linux</th>
    </tr>
  </thead>
  <tbody>
    <tr>
      <td><a href="https://www.wireshark.org/">Wireshark</a></td>
      <td>✅</td>
      <td>✅</td>
      <td>✅</td>
    </tr>
    <tr>
      <td><a href="https://www.telerik.com/fiddler/fiddler-classic">Fiddler</a></td>
      <td>✅</td>
      <td>:x:</td>
      <td>:x:</td>
    </tr>
    <tr>
      <td><a href="https://www.charlesproxy.com/">Charles</a></td>
      <td>:x:</td>
      <td>✅</td>
      <td>:x:</td>
    </tr>
    <tr>
      <td><a href="https://portswigger.net/burp">Burp Suite</a></td>
      <td>✅</td>
      <td>✅</td>
      <td>✅</td>
    </tr>
    <tr>
      <td><a href="https://httptoolkit.com/">HTTP Toolkit</a></td>
      <td>✅</td>
      <td>✅</td>
      <td>✅</td>
    </tr>
  </tbody>
</table>

<p>Personally, I tend to use Fiddler on Windows most of the time, but on a Mac I’ll use Charles. Wireshark can do everything, but with that comes a huge amount of complexity that I find is overkill for HTTP debugging. Particularly when it comes to debugging TLS encrypted sessions.</p>

<p>Choose whichever one you want and fire it up. Now, all you need to do is set a couple of environment variables and you’ll be debugging your requests in no time.</p>

<h2 id="sending-requests">Sending Requests</h2>

<p>To tell the libraries to use the proxy rather than send the requests directly to the desired server, you need to set some environment variables. These are <code class="language-plaintext highlighter-rouge">http_proxy</code>, <code class="language-plaintext highlighter-rouge">HTTP_PROXY</code>, <code class="language-plaintext highlighter-rouge">https_proxy</code>, and <code class="language-plaintext highlighter-rouge">HTTPS_PROXY</code>.</p>

<p>Every tool will use its own port for the proxy, but it’s usually 8888, 8080, or 8000 by default.</p>

<p>If we use Fiddler, which is on port 8888, as an example you’d set these environment variables as follows:</p>

<div class="language-plaintext highlighter-rouge"><div class="highlight"><pre class="highlight"><code>http_proxy=http://127.0.0.1:8888
HTTP_PROXY=http://127.0.0.1:8888
https_proxy=http://127.0.0.1:8888
HTTPS_PROXY=http://127.0.0.1:8888
</code></pre></div></div>

<p>Note, you can also do this in your Python code:</p>

<div class="language-python highlighter-rouge"><div class="highlight"><pre class="highlight"><code><span class="n">proxy</span> <span class="o">=</span> <span class="s">'http://127.0.0.1:8888'</span>
<span class="n">os</span><span class="p">.</span><span class="n">environ</span><span class="p">[</span><span class="s">'http_proxy'</span><span class="p">]</span> <span class="o">=</span> <span class="n">proxy</span> 
<span class="n">os</span><span class="p">.</span><span class="n">environ</span><span class="p">[</span><span class="s">'HTTP_PROXY'</span><span class="p">]</span> <span class="o">=</span> <span class="n">proxy</span>
<span class="n">os</span><span class="p">.</span><span class="n">environ</span><span class="p">[</span><span class="s">'https_proxy'</span><span class="p">]</span> <span class="o">=</span> <span class="n">proxy</span>
<span class="n">os</span><span class="p">.</span><span class="n">environ</span><span class="p">[</span><span class="s">'HTTPS_PROXY'</span><span class="p">]</span> <span class="o">=</span> <span class="n">proxy</span>
</code></pre></div></div>

<p>Now, open up Python and make a request:</p>

<div class="language-python highlighter-rouge"><div class="highlight"><pre class="highlight"><code><span class="kn">import</span> <span class="nn">requests</span>

<span class="n">response</span> <span class="o">=</span> <span class="n">requests</span><span class="p">.</span><span class="n">get</span><span class="p">(</span><span class="s">"http://example.com"</span><span class="p">)</span>
<span class="k">print</span><span class="p">(</span><span class="n">response</span><span class="p">.</span><span class="n">text</span><span class="p">)</span>
</code></pre></div></div>

<p>You’ll get a lovely stream of HTML coming back. If you look in your tool (again using Fiddler as an example), you can see the following:</p>

<p><img src="/images/posts/2023-07-04-http-request-fiddler.png" alt="A screenshot of Fiddler showing brief details about the captured request" /></p>

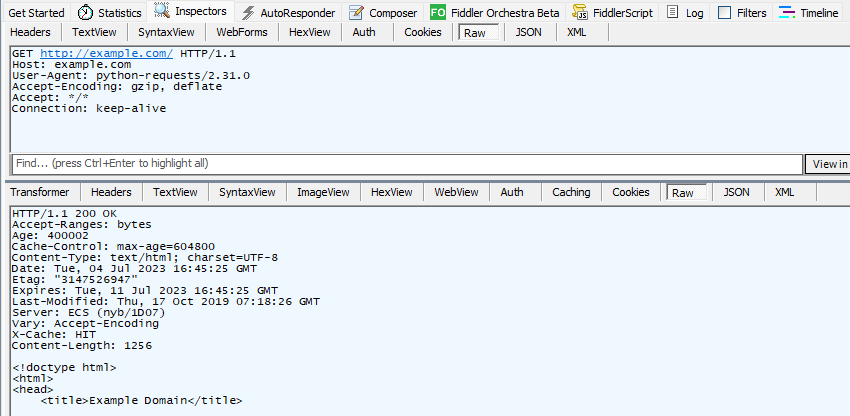
<p>And if we look at the inspectors, we can see the request sent at the top, and the response recieved at the bottom:</p>

<p><img src="/images/posts/2023-07-04-http-request-fiddler-inspector.png" alt="A screenshot of Fiddler showing the raw text sent for the HTTP request, as well as the data sent back" /></p>

<p>There’s a problem though. Try again with this code:</p>

<div class="language-python highlighter-rouge"><div class="highlight"><pre class="highlight"><code><span class="kn">import</span> <span class="nn">requests</span>

<span class="n">response</span> <span class="o">=</span> <span class="n">requests</span><span class="p">.</span><span class="n">get</span><span class="p">(</span><span class="s">"https://example.com"</span><span class="p">)</span> <span class="c1"># Note the 'https'
</span><span class="k">print</span><span class="p">(</span><span class="n">response</span><span class="p">.</span><span class="n">text</span><span class="p">)</span>
</code></pre></div></div>

<p>This time you’ll get an SSL error. Since the proxy is in the middle, it’s trying to decode the request you send (you may have to turn this feature on in your proxy) so it can display it, before then forwarding on to <code class="language-plaintext highlighter-rouge">example.com</code>. However, the library has correctly realised that your connection is not secure any longer and throws an exception.</p>

<h2 id="root-certificates">Root Certificates</h2>

<p>These tools generate their own <a href="https://en.wikipedia.org/wiki/Root_certificate">root certificates</a> and use those when forwarding the requests. If our tools are told about these certificates, and that they can be trusted, then we can make TLS encrypted requests and the proxy will be able to debug and display them.</p>

<p>To do this, we first need to export the certificate from our tool. With Fiddler, you can get it from a link by visiting <code class="language-plaintext highlighter-rouge">http://127.0.0.1:8888</code>. For Burp Suite, you open the tool, visit the “Proxy” tab, and select “Import / export CA certificate”. Other tools have similar mechanisms.</p>

<p>Now, we need to convert this certificate into the <code class="language-plaintext highlighter-rouge">PEM</code> format. Depending on the tool, how it exported it, and the OS you are on, the instructions here will vary. Generally searching for “Convert [ext] into PEM on [OS]” will get you what you need.</p>

<p>Once you have your root certificate as a PEM file, you just need to tell the various tools about it with yet another environment variable. <code class="language-plaintext highlighter-rouge">requests</code> uses one called <code class="language-plaintext highlighter-rouge">REQUESTS_CA_BUNDLE</code>. <code class="language-plaintext highlighter-rouge">httplib2</code> uses <code class="language-plaintext highlighter-rouge">HTTPLIB2_CA_CERTS</code>. But both just expect a path to the file. e.g.</p>

<div class="language-plaintext highlighter-rouge"><div class="highlight"><pre class="highlight"><code>HTTPLIB2_CA_CERTS="/path/to/cert.pem"
REQUESTS_CA_BUNDLE="/path/to/cert.pem"
</code></pre></div></div>

<p>Again, this can be done in Python code.</p>

<h2 id="making-a-tls-request">Making a TLS request</h2>

<p>Now if we try the code from before:</p>

<div class="language-python highlighter-rouge"><div class="highlight"><pre class="highlight"><code><span class="kn">import</span> <span class="nn">requests</span>

<span class="n">response</span> <span class="o">=</span> <span class="n">requests</span><span class="p">.</span><span class="n">get</span><span class="p">(</span><span class="s">"https://example.com"</span><span class="p">)</span>
<span class="k">print</span><span class="p">(</span><span class="n">response</span><span class="p">.</span><span class="n">text</span><span class="p">)</span>
</code></pre></div></div>

<p>You will see the HTML in your console, and the request will appear in your debugger.</p>

<h2 id="other-features">Other Features</h2>

<p>Viewing HTTP(S) requests and responses is just one small part of what these tools can do. They can be configured to automatically drop certain requests, respond with pre-canned information to others, and even run scripts to process and respond. I’ve even written about <a href="/2016/10/25/easy-request-response-rules-in-fidder">Fiddler response rules</a> before. Each tool has different features and capabilities, but when you’ve picked one, it’s well worth knowing what they can do. And obviously, this isn’t limited to Python. Other tools, languages and libraries will be able to be debugged this way. Sometimes you’ll get lucky and they’ll respect the system settings. Other times you’ll need to do what you did here with the environment variables.</p>]]></content><author><name>Dale Myers</name></author><category term="python" /><category term="http" /><category term="api" /><category term="web" /><category term="fiddler" /><summary type="html"><![CDATA[Debugging Python HTTP Requests]]></summary></entry><entry><title type="html">The tools that power Outlook</title><link href="https://myers.io/2022/04/16/the-tools-that-power-outlook/" rel="alternate" type="text/html" title="The tools that power Outlook" /><published>2022-04-16T19:21:00+01:00</published><updated>2022-04-16T19:21:00+01:00</updated><id>https://myers.io/2022/04/16/the-tools-that-power-outlook</id><content type="html" xml:base="https://myers.io/2022/04/16/the-tools-that-power-outlook/"><![CDATA[<p>I’ve been responsible for the developer tooling for Outlook iOS for 6 years now. Back when I started, we had just a single Bash script that covered everything we though we needed at the time. Now, we have 30,000+ lines of Python code (including tests I have to admit) that depend <em>directly</em> on 50 Python packages. Most of these packages are ones you might expect such as <code class="language-plaintext highlighter-rouge">requests</code>, <code class="language-plaintext highlighter-rouge">pylint</code>, or <code class="language-plaintext highlighter-rouge">black</code>. However, 13 are our own and shared with others. Of those 13, 9 are open source and available for the general community. A further 3 out of the 50 packages we use are my own creation from outside work. While some are personal, and some were created at work, all were created by me.</p>

<p>Without these packages, Outlook iOS wouldn’t be where it is today. Personally, I think these various tools were paramount to allowing developers to focus on what really matters: Developing the app. Knowing that these tools were available and could handle the various day to day issues removes a massive burden and improves the results we see.</p>

<p>These various tools have been so successful that many other teams at Microsoft contact me asking to use them. I have to admit that it gives me the greatest pleasure when I can point out that not only can they use them, but they are open-source so <em>anyone</em> can use them.</p>

<p>Here is a brief description of each of these tools that I created and how you can use them for your app/library/etc. (Note: order does not imply importance)</p>

<h2 id="foundations">Foundations</h2>

<h3 id="1-deserialize">1. deserialize</h3>

<p>First up is a personal creation, <a href="https://pypi.org/project/deserialize/">deserialize</a>. This library takes a dictionary or list and a type and creates an instance of that type using the data supplied.</p>

<p>For example, if you want to convert this data:</p>

<div class="language-python highlighter-rouge"><div class="highlight"><pre class="highlight"><code><span class="p">{</span><span class="s">"a"</span><span class="p">:</span> <span class="mi">1</span><span class="p">,</span> <span class="s">"b"</span><span class="p">:</span> <span class="mi">2</span><span class="p">}</span>
</code></pre></div></div>

<p>Into an object with <code class="language-plaintext highlighter-rouge">a</code> and <code class="language-plaintext highlighter-rouge">b</code> as properties, you’d have to do something like this:</p>

<div class="language-python highlighter-rouge"><div class="highlight"><pre class="highlight"><code><span class="k">class</span> <span class="nc">MyThing</span><span class="p">:</span>

    <span class="k">def</span> <span class="nf">__init__</span><span class="p">(</span><span class="bp">self</span><span class="p">,</span> <span class="n">a</span><span class="p">,</span> <span class="n">b</span><span class="p">):</span>
        <span class="bp">self</span><span class="p">.</span><span class="n">a</span> <span class="o">=</span> <span class="n">a</span>
        <span class="bp">self</span><span class="p">.</span><span class="n">b</span> <span class="o">=</span> <span class="n">b</span>

    <span class="o">@</span><span class="nb">staticmethod</span>
    <span class="k">def</span> <span class="nf">from_json</span><span class="p">(</span><span class="n">json_data</span><span class="p">):</span>
        <span class="n">a_value</span> <span class="o">=</span> <span class="n">json_data</span><span class="p">.</span><span class="n">get</span><span class="p">(</span><span class="s">"a"</span><span class="p">)</span>
        <span class="n">b_value</span> <span class="o">=</span> <span class="n">json_data</span><span class="p">.</span><span class="n">get</span><span class="p">(</span><span class="s">"b"</span><span class="p">)</span>

        <span class="k">if</span> <span class="n">a_value</span> <span class="ow">is</span> <span class="bp">None</span><span class="p">:</span>
            <span class="k">raise</span> <span class="nb">Exception</span><span class="p">(</span><span class="s">"'a' was None"</span><span class="p">)</span>
        <span class="k">elif</span> <span class="n">b_value</span> <span class="ow">is</span> <span class="bp">None</span><span class="p">:</span>
            <span class="k">raise</span> <span class="nb">Exception</span><span class="p">(</span><span class="s">"'b' was None"</span><span class="p">)</span>
        <span class="k">elif</span> <span class="nb">type</span><span class="p">(</span><span class="n">a_value</span><span class="p">)</span> <span class="o">!=</span> <span class="nb">int</span><span class="p">:</span>
            <span class="k">raise</span> <span class="nb">Exception</span><span class="p">(</span><span class="s">"'a' was not an int"</span><span class="p">)</span>
        <span class="k">elif</span> <span class="nb">type</span><span class="p">(</span><span class="n">b_value</span><span class="p">)</span> <span class="o">!=</span> <span class="nb">int</span><span class="p">:</span>
            <span class="k">raise</span> <span class="nb">Exception</span><span class="p">(</span><span class="s">"'b' was not an int"</span><span class="p">)</span>

        <span class="k">return</span> <span class="n">MyThing</span><span class="p">(</span><span class="n">a_value</span><span class="p">,</span> <span class="n">b_value</span><span class="p">)</span>

<span class="n">my_instance</span> <span class="o">=</span> <span class="n">MyThing</span><span class="p">.</span><span class="n">from_json</span><span class="p">(</span><span class="n">json_data</span><span class="p">)</span>
</code></pre></div></div>

<p>With <code class="language-plaintext highlighter-rouge">deserialize</code>, all you need to do is:</p>

<div class="language-python highlighter-rouge"><div class="highlight"><pre class="highlight"><code><span class="kn">import</span> <span class="nn">deserialize</span>

<span class="k">class</span> <span class="nc">MyThing</span><span class="p">:</span>
    <span class="n">a</span><span class="p">:</span> <span class="nb">int</span>
    <span class="n">b</span><span class="p">:</span> <span class="nb">int</span>

<span class="n">my_instance</span> <span class="o">=</span> <span class="n">deserialize</span><span class="p">.</span><span class="n">deserialize</span><span class="p">(</span><span class="n">MyThing</span><span class="p">,</span> <span class="n">json_data</span><span class="p">)</span>
</code></pre></div></div>

<p><code class="language-plaintext highlighter-rouge">deserialize</code> will run all the checks for you and give you a nice new shiny object from it. It of course works to any depth of types, and not just primitives.</p>

<p>The reason this comes up as #1 is because it a foundational building block of so many other packages in here. If I ever consume from a REST API, load data from disk, or even query a database, you can be sure I’ll have at the very least considered using this package to make it easy and error free.</p>

<h3 id="2-protool">2. protool</h3>

<p><a href="https://pypi.org/project/protool/">protool</a> removes all the pain from dealing with provisioning profiles. Instead of being mysterious binary files, <code class="language-plaintext highlighter-rouge">protool</code> makes them easy to use, understand, and work with. Some examples of what it can do:</p>

<ul>
  <li>Easily diff between two profiles using <code class="language-plaintext highlighter-rouge">protool diff --profiles /path/to/profile1 /path/to/profile2</code></li>
  <li>Get a property from a profile: <code class="language-plaintext highlighter-rouge">protool read --profile /path/to/profile --key UUID</code></li>
  <li>See the raw XML without having to memorise the obscure parameters for the <code class="language-plaintext highlighter-rouge">security</code> command: <code class="language-plaintext highlighter-rouge">protool decode --profile /path/to/profile</code></li>
</ul>

<p>These commands are actually based around the full Python API it provides. Some examples:</p>

<div class="language-python highlighter-rouge"><div class="highlight"><pre class="highlight"><code><span class="kn">import</span> <span class="nn">protool</span>
<span class="n">profile</span> <span class="o">=</span> <span class="n">protool</span><span class="p">.</span><span class="n">ProvisioningProfile</span><span class="p">(</span><span class="s">"/path/to/profile"</span><span class="p">)</span>

<span class="c1"># Get the diff of two profiles
</span><span class="n">diff</span> <span class="o">=</span> <span class="n">protool</span><span class="p">.</span><span class="n">diff</span><span class="p">(</span><span class="s">"/path/to/first"</span><span class="p">,</span> <span class="s">"/path/to/second"</span><span class="p">,</span> <span class="n">tool_override</span><span class="o">=</span><span class="s">"diff"</span><span class="p">)</span>

<span class="c1"># Get the UUID of a profile
</span><span class="k">print</span> <span class="n">profile</span><span class="p">.</span><span class="n">uuid</span>

<span class="c1"># Get the full XML of the profile
</span><span class="k">print</span> <span class="n">profile</span><span class="p">.</span><span class="n">xml</span>

<span class="c1"># Get the parsed contents of the profile as a dictionary
</span><span class="k">print</span> <span class="n">profile</span><span class="p">.</span><span class="n">contents</span><span class="p">()</span>
</code></pre></div></div>

<p>Personally, the start feature of protool is as a diff driver for git. Normally if you change profiles you see “Binary files differ” from git. With <code class="language-plaintext highlighter-rouge">protool</code> you can edit your git config (at any level) and add:</p>

<div class="language-plaintext highlighter-rouge"><div class="highlight"><pre class="highlight"><code>[diff "mobileprovision"]
    external = protool gitdiff -g
</code></pre></div></div>

<p>This will let you see the differences in XML format. However, that on its own isn’t particularly helpful. You could just have easily used <code class="language-plaintext highlighter-rouge">security cms -D -i</code> on in the config and it would do the same thing. The real power is in being able to ignore keys. For example:</p>

<div class="language-plaintext highlighter-rouge"><div class="highlight"><pre class="highlight"><code>[diff "mobileprovision"]
    external = protool gitdiff -i TimeToLive UUID -g
</code></pre></div></div>

<p>This will ignore the time to live value, as well as the UUID in the diff. You know those will be different between any two profiles, so why bother cluttering your diff with them?</p>

<h3 id="3-dotstrings">3. dotstrings</h3>

<p>Dealing with localization can be tough, but <a href="https://pypi.org/project/dotstrings/">dotstrings</a> makes it just that little bit easier.</p>

<p>This tiny tool does one thing and one thing only: It reads your <code class="language-plaintext highlighter-rouge">.strings</code> files. Here’s the entirety of what it does:</p>

<div class="language-python highlighter-rouge"><div class="highlight"><pre class="highlight"><code><span class="kn">import</span> <span class="nn">dotstrings</span>

<span class="n">entries</span> <span class="o">=</span> <span class="n">dotstrings</span><span class="p">.</span><span class="n">load</span><span class="p">(</span><span class="s">"/path/to/file.strings"</span><span class="p">)</span>

<span class="k">for</span> <span class="n">entry</span> <span class="ow">in</span> <span class="n">entries</span><span class="p">:</span>
    <span class="k">print</span><span class="p">(</span><span class="s">"Key: "</span> <span class="o">+</span> <span class="n">entry</span><span class="p">.</span><span class="n">key</span><span class="p">)</span>
    <span class="k">print</span><span class="p">(</span><span class="s">"Value: "</span> <span class="o">+</span> <span class="n">entry</span><span class="p">.</span><span class="n">value</span><span class="p">)</span>
    <span class="k">print</span><span class="p">(</span><span class="s">"Comments: "</span> <span class="o">+</span> <span class="s">"</span><span class="se">\n</span><span class="s">"</span><span class="p">.</span><span class="n">join</span><span class="p">(</span><span class="n">entry</span><span class="p">.</span><span class="n">comments</span><span class="p">))</span>
</code></pre></div></div>

<p>Why is that useful you ask? Well, it allows you to test your strings easily! We use it directly for a bunch of checks, but you’ll see later how we integrate it with another tool for even better testing.</p>

<h3 id="4-xcodeproj">4. xcodeproj</h3>

<p>One of the most annoying and difficult things to comprehend as an Apple developer is the Xcode project format. Testing it to ensure that developers haven’t accidentally broken anything, or moved files where they shouldn’t be, etc. can be a real nightmare. Especially when coupled with the fact that the <code class="language-plaintext highlighter-rouge">pbxproj</code> format is inscrutable to most. This is where <a href="https://pypi.org/project/xcodeproj/">xcodeproj</a> comes in. It aims to solve all of those woes. By simply running:</p>

<div class="language-python highlighter-rouge"><div class="highlight"><pre class="highlight"><code><span class="kn">import</span> <span class="nn">xcodeproj</span>
<span class="n">project</span> <span class="o">=</span> <span class="n">xcodeproj</span><span class="p">.</span><span class="n">XcodeProject</span><span class="p">(</span><span class="s">"/path/to/project.xcodeproj"</span><span class="p">)</span>
</code></pre></div></div>

<p>you now have a nice, easy to understand, simple to use, project object which you can test directly.</p>

<p>Let’s look at a trivial example where you are sick of seeing Xcode have those files highlighted in red because they exist in the project but no longer exist on disk. How would you make sure no one is accidentally committing changes with that? Easy!</p>

<div class="language-python highlighter-rouge"><div class="highlight"><pre class="highlight"><code><span class="kn">import</span> <span class="nn">xcodeproj</span>

<span class="n">project</span> <span class="o">=</span> <span class="n">xcodeproj</span><span class="p">.</span><span class="n">XcodeProject</span><span class="p">(</span><span class="s">"/path/to/project.xcodeproj"</span><span class="p">)</span>

<span class="k">for</span> <span class="n">item</span> <span class="ow">in</span> <span class="n">project</span><span class="p">.</span><span class="n">fetch_type</span><span class="p">(</span><span class="n">xcodeproj</span><span class="p">.</span><span class="n">PBXFileReference</span><span class="p">).</span><span class="n">values</span><span class="p">():</span>
    <span class="k">assert</span> <span class="n">os</span><span class="p">.</span><span class="n">path</span><span class="p">.</span><span class="n">exists</span><span class="p">(</span><span class="n">item</span><span class="p">.</span><span class="n">absolute_path</span><span class="p">())</span>
</code></pre></div></div>

<p>This library makes Xcode projects something which can be part of your code reviews and no longer some mysterious black box where people automatically approve changes to pbxproj files.</p>

<h3 id="5-xcresult">5. xcresult</h3>

<p>Another personal creation here. <a href="https://pypi.org/project/xcresult/">xcresult</a> does exactly what it sounds like. It lets you work with xcresult bundles. When you buiild, run tests, etc. Xcode will generate an xcresult bundle with the, you guessed it, results of the operation in there. Reading it though to get the data out is a whole different story.</p>

<p>For example, let’s say you run snapshot tests and one is failing. You know there are two images in there somewhere, how do you get them out? There’s absolutely no hint in the logs. Thankfully, it’s relatively easy:</p>

<div class="language-python highlighter-rouge"><div class="highlight"><pre class="highlight"><code><span class="n">results_bundle</span> <span class="o">=</span> <span class="n">xcresult</span><span class="p">.</span><span class="n">Xcresults</span><span class="p">(</span><span class="n">results_bundle_path</span><span class="p">)</span>
<span class="n">attachments_path</span> <span class="o">=</span> <span class="s">"/some/output/folder"</span>
<span class="n">os</span><span class="p">.</span><span class="n">makedirs</span><span class="p">(</span><span class="n">attachments_path</span><span class="p">,</span> <span class="n">exist_ok</span><span class="o">=</span><span class="bp">True</span><span class="p">)</span>
<span class="n">results_bundle</span><span class="p">.</span><span class="n">export_attachments</span><span class="p">(</span><span class="n">attachments_path</span><span class="p">)</span>
</code></pre></div></div>

<p>Now all the images, etc. that are in this bundle are available as PNG images. These can then be easily surfaced to what ever CI system you are using so that developers can easily see exactly what went wrong. For example, if you use Azure DevOps, you might see something like this attached to your build:</p>

<p><img src="/images/posts/2022-04-16-xcresult-example.png" alt="Example of snapshot differences in the ADO UI" /></p>

<h2 id="testing">Testing</h2>

<h3 id="6-isim">6. isim</h3>

<p>Dealing with simulators can be tricky at the best of times. So many questions around things like “Do you wipe them after each test run?”, “If so, how?”, “How do I create a simulator for a test for a particular device?”, etc. <a href="https://pypi.org/project/isim/">isim</a>, and you might be seeing a pattern here, tries to make that as simple as possible.</p>

<p>Many of you reading this will be familiar with the <code class="language-plaintext highlighter-rouge">xcrun simctl</code> command. If you are working in a system where Bash works for you, then you don’t need to read any further. If you are a Python shop, then isim will be a life saver. It’s essentially a wrapper around that command to make it as easy to use as possible, while being easy to use if you are already familiar with the command.</p>

<p>For example, <code class="language-plaintext highlighter-rouge">xcrun simctl list runtimes</code> becomes <code class="language-plaintext highlighter-rouge">isim.Runtime.list_all()</code>. And in general, <code class="language-plaintext highlighter-rouge">xcrun simctl do_thing [DEVICE_ID] arg1 arg2</code> becomes:</p>

<div class="language-python highlighter-rouge"><div class="highlight"><pre class="highlight"><code><span class="n">device</span> <span class="o">=</span> <span class="n">isim</span><span class="p">.</span><span class="n">Device</span><span class="p">.</span><span class="n">from_identifier</span><span class="p">(</span><span class="n">DEVICE_ID</span><span class="p">)</span>
<span class="n">device</span><span class="p">.</span><span class="n">do_thing</span><span class="p">(</span><span class="n">arg1</span><span class="p">,</span> <span class="n">arg2</span><span class="p">)</span>
</code></pre></div></div>

<p>If your CI is Python based and you aren’t using isim, then either you are making life harder for yourself, or you have a fantastic solution of your own I’d love to know about!</p>

<h2 id="localization">Localization</h2>

<h3 id="7-localizationkit">7. localizationkit</h3>

<p>Localization is incredibly difficult. In the best case scenario, you write some strings, send them off to translators, get them back and ship them. But what if there was a mistake? What if you sent the string <code class="language-plaintext highlighter-rouge">Hello %@!</code> where you’d replace <code class="language-plaintext highlighter-rouge">%@</code> with the persons name, but your French translators send back <code class="language-plaintext highlighter-rouge">Bonjour!</code> with no token? Well, at runtime, your app is going to crash. Ok, sure, it’s unlikely that this would happen, but what if you have 2000 strings in your app? Then it’s 2000 times more likely to happen? What if you support 70 languages? Then it’s 140,000 times more likely to happen! At that scale, mistakes happen. How do you catch them? With <a href="https://pypi.org/project/localizationkit/">localizationkit</a>. This tool is a suite of tests to ensure that your localized strings are the best that they can be. What sorts of things can it check for?</p>

<ul>
  <li>Checking that all strings have comments</li>
  <li>Checking that the comments don’t just match the value</li>
  <li>Check that tokens have position specifiers (e.g. <code class="language-plaintext highlighter-rouge">Hello %1$@, the weather is %2$@</code> instead of <code class="language-plaintext highlighter-rouge">Hello %@, the weather is %@</code>)</li>
  <li>Check that no invalid tokens are included (e.g. no accidental instances of <code class="language-plaintext highlighter-rouge">The stocks went up to 100 %*</code>)</li>
</ul>

<p>This tool alone has saved us countless times from runtime crashes.</p>

<p>I mentioned above, that <code class="language-plaintext highlighter-rouge">dotstrings</code> integrates with other tools. This is one example. <code class="language-plaintext highlighter-rouge">localizationkit</code> is platform agnostic. It takes in a string “collection” where each string consists of a key, value and comment. Combining the two to test is trivial:</p>

<div class="language-python highlighter-rouge"><div class="highlight"><pre class="highlight"><code><span class="n">bundle</span> <span class="o">=</span> <span class="n">dotstrings</span><span class="p">.</span><span class="n">load_all_strings</span><span class="p">(</span><span class="s">"/path/to/table.strings"</span><span class="p">)</span>
<span class="n">strings</span> <span class="o">=</span> <span class="p">[</span><span class="n">localizationkit</span><span class="p">.</span><span class="n">LocalizedString</span><span class="p">(</span><span class="n">string</span><span class="p">.</span><span class="n">key</span><span class="p">,</span> <span class="n">string</span><span class="p">.</span><span class="n">value</span><span class="p">,</span> <span class="n">string</span><span class="p">.</span><span class="n">comment</span><span class="p">,</span> <span class="s">"en-GB"</span><span class="p">)</span> <span class="k">for</span> <span class="n">string</span> <span class="ow">in</span> <span class="n">bundle</span><span class="p">]</span>

<span class="n">collection</span> <span class="o">=</span> <span class="n">localizationkit</span><span class="p">.</span><span class="n">LocalizedCollection</span><span class="p">(</span><span class="n">strings</span><span class="p">)</span>
<span class="n">results</span> <span class="o">=</span> <span class="n">localizationkit</span><span class="p">.</span><span class="n">run_tests</span><span class="p">(</span><span class="n">config</span><span class="p">,</span> <span class="n">collection</span><span class="p">)</span> <span class="c1"># `config` lets you set various parameters
</span>
<span class="n">failures</span> <span class="o">=</span> <span class="p">[</span><span class="n">result</span> <span class="k">for</span> <span class="n">result</span> <span class="ow">in</span> <span class="n">results</span> <span class="k">if</span> <span class="ow">not</span> <span class="n">result</span><span class="p">.</span><span class="n">succeeded</span><span class="p">()]</span>

<span class="k">assert</span> <span class="nb">len</span><span class="p">(</span><span class="n">failures</span><span class="p">)</span> <span class="o">==</span> <span class="mi">0</span><span class="p">,</span> <span class="sa">f</span><span class="s">"Encountered failures: </span><span class="si">{</span><span class="n">failures</span><span class="si">}</span><span class="s">"</span>
</code></pre></div></div>

<h3 id="8-localizedstringkit">8. LocalizedStringKit</h3>

<p>I know, it’s a super similar name to the previous entry, but I wasn’t responsible for the naming scheme, just the code! Out of all of the examples I have here, this is the only one which is a derivative of some earlier work. This work was done by one (or more) of the engineers at Acompli and continues to this day, just in a significantly different form.</p>

<p><a href="https://pypi.org/project/localizedstringkit/">LocalizedStringKit</a> is unique in this list as it’s not only a Python program. It has a Swift/Objective-C counterpart too: <a href="https://swiftpackageindex.com/microsoft/LocalizedStringKit">https://swiftpackageindex.com/microsoft/LocalizedStringKit</a> This tool makes it easier than ever for developers to localize their apps without even needing to think about it!</p>

<p>Normally, the flow to localized a string goes something like this:</p>

<ol>
  <li>Come up with some new string: <code class="language-plaintext highlighter-rouge">label.text = "Your account was successfully added!"</code></li>
  <li>Come up with some “key” for the string: “ACCOUNT_SUCCESSFULLY_ADDED”</li>
  <li>Pray no one has used that key already for some similar string.</li>
  <li>Add this entry into your English .strings file: `“ACCOUNT_SUCCESSFULLY_ADDED” = “Your account was successfully added!”</li>
  <li>Open your PR.</li>
  <li>Realise you forgot to add a comment.</li>
  <li>Add your comment and update your PR.</li>
  <li>Merge your PR.</li>
  <li>Find out that while no one was using your key before, they are now and you’ve got a conflict and weird things are happening.</li>
</ol>

<p>You get my point.</p>

<p>With LocalizedStringKit, you do this:</p>

<ol>
  <li>Create your string and comment: <code class="language-plaintext highlighter-rouge">label.text = LocalizedString("Your account was successfully added", "Shown to the user in an alert when they've added an account to the app, letting them know everything was successful")</code></li>
  <li>Run <code class="language-plaintext highlighter-rouge">localizedstringkit --path /path/to/my/project/root --localized-string-kit-path /path/to/my/project/root/LocalizedStringKit</code> (which you are obviously going to provide a wrapper/alias for which is easy to remember)</li>
</ol>

<p>That’s it. You can add a check in your CI to ensure no one forgets to run the generation script either.</p>

<p>It works by taking a hash of the English string as the key, which is therefore deterministic. Developers lives are significantly simpler and less error prone now.</p>

<h2 id="system">System</h2>

<h3 id="9-keyper">9. keyper</h3>

<p>Interacting with the system keychain from the command line can be a nightmare at best. We all have to do it to install certificates, secrets, etc. and it never gets any easier. So let’s bypass the CLI entirely and use <a href="https://pypi.org/project/keyper/">keyper</a>` in Python instead.</p>

<p>Getting a password is as simple as <code class="language-plaintext highlighter-rouge">password = keyper.get_password(label="my_keychain_password")</code></p>

<p>Installing a certificate is just 3 lines of code:</p>

<div class="language-python highlighter-rouge"><div class="highlight"><pre class="highlight"><code><span class="k">with</span> <span class="n">keyper</span><span class="p">.</span><span class="n">TemporaryKeychain</span><span class="p">()</span> <span class="k">as</span> <span class="n">keychain</span><span class="p">:</span>
    <span class="n">certificate</span> <span class="o">=</span> <span class="n">keyper</span><span class="p">.</span><span class="n">Certificate</span><span class="p">(</span><span class="s">"/path/to/cert"</span><span class="p">,</span> <span class="n">password</span><span class="o">=</span><span class="s">"password"</span><span class="p">)</span>
    <span class="n">keychain</span><span class="p">.</span><span class="n">install_cert</span><span class="p">(</span><span class="n">certificate</span><span class="p">)</span>
</code></pre></div></div>

<p>Of course, you can install to the system keychain, you just need to make sure it is unlocked first.</p>

<p>For this tool, if you are handling certificates or passwords, there is simply no easier way to get them into the keychain.</p>

<h2 id="rest-api-wrappers">REST API Wrappers</h2>

<p>Our first two here are Microsoft stack specific, so if you use something else, feel free to skip.</p>

<h3 id="10-appcenter">10. appcenter</h3>

<p>There’s no point in dressing this one up. <a href="https://pypi.org/project/appcenter/">appcenter</a> is a Python wrapper around the App Center APIs. There is an Open API verison, but we found that the code it generated was difficult to understand and use. <code class="language-plaintext highlighter-rouge">appcenter</code> was born from that. Here are some examples of how it works:</p>

<div class="language-python highlighter-rouge"><div class="highlight"><pre class="highlight"><code><span class="c1"># 1. Import the library
</span><span class="kn">import</span> <span class="nn">appcenter</span>

<span class="c1"># 2. Create a new client
</span><span class="n">client</span> <span class="o">=</span> <span class="n">appcenter</span><span class="p">.</span><span class="n">AppCenterClient</span><span class="p">(</span><span class="n">access_token</span><span class="o">=</span><span class="s">"abc123def456"</span><span class="p">)</span>

<span class="c1"># 3. Check some error groups
</span><span class="n">start</span> <span class="o">=</span> <span class="n">datetime</span><span class="p">.</span><span class="n">datetime</span><span class="p">.</span><span class="n">now</span><span class="p">()</span> <span class="o">-</span> <span class="n">datetime</span><span class="p">.</span><span class="n">timedelta</span><span class="p">(</span><span class="n">days</span><span class="o">=</span><span class="mi">10</span><span class="p">)</span>
<span class="k">for</span> <span class="n">group</span> <span class="ow">in</span> <span class="n">client</span><span class="p">.</span><span class="n">crashes</span><span class="p">.</span><span class="n">get_error_groups</span><span class="p">(</span><span class="n">owner_name</span><span class="o">=</span><span class="s">"owner"</span><span class="p">,</span> <span class="n">app_name</span><span class="o">=</span><span class="s">"myapp"</span><span class="p">,</span> <span class="n">start_time</span><span class="o">=</span><span class="n">start</span><span class="p">):</span>
    <span class="k">print</span><span class="p">(</span><span class="n">group</span><span class="p">.</span><span class="n">errorGroupId</span><span class="p">)</span>
    
<span class="c1"># 4. Get recent versions
</span><span class="k">for</span> <span class="n">version</span> <span class="ow">in</span> <span class="n">client</span><span class="p">.</span><span class="n">versions</span><span class="p">.</span><span class="nb">all</span><span class="p">(</span><span class="n">owner_name</span><span class="o">=</span><span class="s">"owner"</span><span class="p">,</span> <span class="n">app_name</span><span class="o">=</span><span class="s">"myapp"</span><span class="p">):</span>
    <span class="k">print</span><span class="p">(</span><span class="n">version</span><span class="p">)</span>
    
<span class="c1"># 5. Create a new release
</span><span class="n">client</span><span class="p">.</span><span class="n">versions</span><span class="p">.</span><span class="n">upload_and_release</span><span class="p">(</span>
    <span class="n">owner_name</span><span class="o">=</span><span class="s">"owner"</span><span class="p">,</span>
    <span class="n">app_name</span><span class="o">=</span><span class="s">"myapp"</span><span class="p">,</span>
    <span class="n">version</span><span class="o">=</span><span class="s">"0.1"</span><span class="p">,</span>
    <span class="n">build_number</span><span class="o">=</span><span class="s">"123"</span><span class="p">,</span>
    <span class="n">binary_path</span><span class="o">=</span><span class="s">"/path/to/some.ipa"</span><span class="p">,</span>
    <span class="n">group_id</span><span class="o">=</span><span class="s">"12345678-abcd-9012-efgh-345678901234"</span><span class="p">,</span>
    <span class="n">release_notes</span><span class="o">=</span><span class="s">"These are some release notes"</span><span class="p">,</span>
    <span class="n">branch_name</span><span class="o">=</span><span class="s">"test_branch"</span><span class="p">,</span>
    <span class="n">commit_hash</span><span class="o">=</span><span class="s">"1234567890123456789012345678901234567890"</span><span class="p">,</span>
    <span class="n">commit_message</span><span class="o">=</span><span class="s">"This is a commit message"</span>
<span class="p">)</span>
</code></pre></div></div>

<p>What more is there to say? If you use AppCenter, this library will be a life saver.</p>

<h3 id="11-simple_ado">11. simple_ado</h3>

<p>Just like above, there is a Python wrapper around the Azure DevOps (ADO) APIs, but it is difficult to understand and use, and makes reading code reviews significantly more complex as it is difficult to understand intended behavior. Enter <a href="https://pypi.org/project/simple-ado/">simple_ado</a>. The ADO APIs are expansive and <code class="language-plaintext highlighter-rouge">simple_ado</code> can’t possibly cover them all (the clue is in the name: <code class="language-plaintext highlighter-rouge">simple</code>), but it covers the majority of what you would ever need as an iOS/macOS developer. You can manage builds, pull requests, work items, commits, teams, identities, security, plus a ton of other things.</p>

<p>Taking hold of your CI is of the utmost importance for any team. If you use Azure DevOps, this is <em>the</em> tool you want to use. Point me at a different CI and I’m going to create the same thing again for it.</p>

<h3 id="12-asconnect">12. asconnect</h3>

<p>There’s something so satisfying about saving the best for last. There isn’t an iOS developer out there who hasn’t heard of <a href="https://fastlane.tools/">Fastlane</a>. If you want to automate your release process, Fastlane is <em>the</em> tool to use. Unless you aren’t Ruby devs… At which point where do you turn? A few years back, Apple announced they were opening up the App Store Connect APIs. The capabilities don’t yet match what Fastlane is capable of (which uses web scraping if an API isn’t available), but it covers the majority of cases that any developer would care about.</p>

<p>With <a href="https://pypi.org/project/asconnect/">asconnect</a>, you can easily:</p>

<ul>
  <li>Upload builds</li>
  <li>Create new TestFlight versions</li>
  <li>Set review information</li>
  <li>Submit for review</li>
  <li>Set new screenshots and information</li>
</ul>

<p>Plus a bunch of other things. Outlook switched from Fastlane to asconnect almost 2 years ago and has never looked back. No more issues dealing with Fastlane not working because Apple changed a page layout. The APIs work. Every. Single. Time.</p>

<p>As an example of how easy it is to use, let’s look at uploading a build and creating a new app store submission:</p>

<div class="language-python highlighter-rouge"><div class="highlight"><pre class="highlight"><code><span class="kn">import</span> <span class="nn">asconnect</span>

<span class="n">client</span> <span class="o">=</span> <span class="n">asconnect</span><span class="p">.</span><span class="n">Client</span><span class="p">(</span><span class="n">key_id</span><span class="o">=</span><span class="s">"..."</span><span class="p">,</span> <span class="n">key_contents</span><span class="o">=</span><span class="s">"..."</span><span class="p">,</span> <span class="n">issuer_id</span><span class="o">=</span><span class="s">"..."</span><span class="p">)</span>

<span class="c1"># Upload the build
</span><span class="n">client</span><span class="p">.</span><span class="n">build</span><span class="p">.</span><span class="n">upload</span><span class="p">(</span>
  <span class="n">ipa_path</span><span class="o">=</span><span class="s">"/path/to/the/app.ipa"</span><span class="p">,</span>
  <span class="n">platform</span><span class="o">=</span><span class="n">asconnect</span><span class="p">.</span><span class="n">Platform</span><span class="p">.</span><span class="n">ios</span><span class="p">,</span>
<span class="p">)</span>

<span class="c1"># Wait for it to finish processing
</span><span class="n">build</span> <span class="o">=</span> <span class="n">client</span><span class="p">.</span><span class="n">build</span><span class="p">.</span><span class="n">wait_for_build_to_process</span><span class="p">(</span><span class="s">"com.example.my_bundle_id"</span><span class="p">,</span> <span class="n">build_number</span><span class="p">)</span>

<span class="c1"># Create a new version
</span><span class="n">version</span> <span class="o">=</span> <span class="n">client</span><span class="p">.</span><span class="n">app</span><span class="p">.</span><span class="n">create_new_version</span><span class="p">(</span><span class="n">version</span><span class="o">=</span><span class="s">"1.2.3"</span><span class="p">,</span> <span class="n">app_id</span><span class="o">=</span><span class="n">app</span><span class="p">.</span><span class="n">identifier</span><span class="p">)</span>

<span class="c1"># Set the build for that version
</span><span class="n">client</span><span class="p">.</span><span class="n">version</span><span class="p">.</span><span class="n">set_build</span><span class="p">(</span><span class="n">version_id</span><span class="o">=</span><span class="n">version</span><span class="p">.</span><span class="n">identifier</span><span class="p">,</span> <span class="n">build_id</span><span class="o">=</span><span class="n">build</span><span class="p">.</span><span class="n">identifier</span><span class="p">)</span>

<span class="c1"># Submit for review
</span><span class="n">client</span><span class="p">.</span><span class="n">version</span><span class="p">.</span><span class="n">submit_for_review</span><span class="p">(</span><span class="n">version_id</span><span class="o">=</span><span class="n">version</span><span class="p">.</span><span class="n">identifier</span><span class="p">)</span>
</code></pre></div></div>

<p>It’s as simple as that. You will no longer have to have someone do these steps manually every week if you aren’t already using a similar tool. And if you are using FastLane, while a phenomenal tool that asconnect can never hope to compete with, you won’t have to worry about it breaking because Apple made some changes to a random web page.</p>]]></content><author><name>Dale Myers</name></author><category term="outlook" /><category term="ios" /><category term="python" /><summary type="html"><![CDATA[I’ve been responsible for the developer tooling for Outlook iOS for 6 years now. Back when I started, we had just a single Bash script that covered everything we though we needed at the time. Now, we have 30,000+ lines of Python code (including tests I have to admit) that depend directly on 50 Python packages. Most of these packages are ones you might expect such as requests, pylint, or black. However, 13 are our own and shared with others. Of those 13, 9 are open source and available for the general community. A further 3 out of the 50 packages we use are my own creation from outside work. While some are personal, and some were created at work, all were created by me.]]></summary></entry><entry><title type="html">Debugging Timer Triggers in Azure Functions</title><link href="https://myers.io/2019/10/25/debugging-timer-triggers-in-azure-functions/" rel="alternate" type="text/html" title="Debugging Timer Triggers in Azure Functions" /><published>2019-10-25T09:15:00+01:00</published><updated>2019-10-25T09:15:00+01:00</updated><id>https://myers.io/2019/10/25/debugging-timer-triggers-in-azure-functions</id><content type="html" xml:base="https://myers.io/2019/10/25/debugging-timer-triggers-in-azure-functions/"><![CDATA[<p>It’s relatively easy to figure out that VS Code is a great editor for developing
and debugging Azure Functions. You’ll have also no doubt figured out that for
debugging HTTP trigger functions all you have to do is open a web browser or use
cURL or similar to trigger the function and be able to debug it. What about
timer triggers though?</p>

<p>It turns out that it’s not that much harder. You just need to send a POST to
<code class="language-plaintext highlighter-rouge">http://127.0.0.1:7071/admin/functions/MyTimerTrigger</code> with a body of <code class="language-plaintext highlighter-rouge">{}</code> and
the content type set to <code class="language-plaintext highlighter-rouge">application/json</code>.</p>

<p>That’s all there is to it. If you miss out the body, or don’t do a POST, you’ll
get the function information back instead of triggering it.</p>]]></content><author><name>Dale Myers</name></author><category term="azure" /><category term="functions" /><summary type="html"><![CDATA[It’s relatively easy to figure out that VS Code is a great editor for developing and debugging Azure Functions. You’ll have also no doubt figured out that for debugging HTTP trigger functions all you have to do is open a web browser or use cURL or similar to trigger the function and be able to debug it. What about timer triggers though?]]></summary></entry><entry><title type="html">What is the Purpose of a Lock File for Package Managers?</title><link href="https://myers.io/2019/01/13/what-is-the-purpose-of-a-lock-file-for-package-managers/" rel="alternate" type="text/html" title="What is the Purpose of a Lock File for Package Managers?" /><published>2019-01-13T12:00:00+00:00</published><updated>2019-01-13T12:00:00+00:00</updated><id>https://myers.io/2019/01/13/what-is-the-purpose-of-a-lock-file-for-package-managers</id><content type="html" xml:base="https://myers.io/2019/01/13/what-is-the-purpose-of-a-lock-file-for-package-managers/"><![CDATA[<p>Whatever language and package manager you use, be it Ruby Gems, CocoaPods, NPM, Cargo, etc. there’s a good chance that if you have a file specifying your dependencies (such as <code class="language-plaintext highlighter-rouge">Gemfile</code>, <code class="language-plaintext highlighter-rouge">Podfile</code>, <code class="language-plaintext highlighter-rouge">package.json</code> or <code class="language-plaintext highlighter-rouge">Cargo.toml</code>), there’s a corresponding <code class="language-plaintext highlighter-rouge">.lock</code> file. It’s not always clear what the purpose of these files are, and whether or not they should be checked in to your repo.</p>

<p>I’m going to use CocoaPods as the example for this, but most package managers are the same and the same logic applies.</p>

<p>Here’s an example <code class="language-plaintext highlighter-rouge">Podfile</code>:</p>

<div class="language-ruby highlighter-rouge"><div class="highlight"><pre class="highlight"><code><span class="n">platform</span> <span class="ss">:ios</span><span class="p">,</span> <span class="s1">'10.0'</span>

<span class="n">source</span> <span class="s1">'https://github.com/CocoaPods/Specs.git'</span>

<span class="n">target</span> <span class="s1">'MyApp'</span> <span class="k">do</span>
  <span class="n">pod</span> <span class="s1">'SwiftLint'</span><span class="p">,</span> <span class="s1">'~&gt; 0.29.1'</span>
  <span class="n">pod</span> <span class="s1">'OCMock'</span><span class="p">,</span> <span class="s1">'~&gt; 2.0.1'</span>
<span class="k">end</span>
</code></pre></div></div>

<p>This file basically says, let’s install a version of SwiftLint that is at least 0.29.1 and up to, but not including 0.30.0. Similarly, it wants OCMock from at least 2.0.1 up to, but not including 2.1.0. Different tools use slightly different operators for these sorts of things, so make sure you are using the right one for your tool.</p>

<p>When we run <code class="language-plaintext highlighter-rouge">pod install</code>, CocoaPods analyses this file, finds the dependencies, figures out what versions it can possibly install, and then does so. By default, most package managers will take the latest possible version that meets the requirements specified. So if there was a version 0.29.7 of SwiftLint as the latest available one, that’s what would be installed. OCMock is still on 2.0.1 so that’s what you get.</p>

<p>You then go and create some project using these dependencies, check in your <code class="language-plaintext highlighter-rouge">Podfile</code> and everything looks good. Someone else on your team checks out the commit, and runs <code class="language-plaintext highlighter-rouge">pod install</code> and they end up with OCMock 2.0.1, however they get SwiftLint 0.29.8. That could be problematic. In theory, the two versions should be compatible, but despite everyone’s best efforts, mistakes can still be made. How do you make sure that everyone on your team gets the same version as you? Well, that’s where the lock file comes in.</p>

<p>When you run <code class="language-plaintext highlighter-rouge">pod install</code>, not only does it resolve the dependencies and install, it generates a <code class="language-plaintext highlighter-rouge">Podfile.lock</code>. This file contains the <em>exact</em> versions of all the dependencies (and their dependencies) that were installed. If you run <code class="language-plaintext highlighter-rouge">pod install</code> and there is a <code class="language-plaintext highlighter-rouge">Podfile.lock</code>, then instead of resolving the dependencies and taking the latest possible, it instead looks at the versions in the lock file and install those. Now, if you check in your <code class="language-plaintext highlighter-rouge">Podfile.lock</code>, when your team mates run <code class="language-plaintext highlighter-rouge">pod install</code>, they get the exact same versions that you have.</p>

<p>So, it’s clear where lock files help. But do you always need them? What if you pin your versions exactly. Instead of <code class="language-plaintext highlighter-rouge">pod 'SwiftLint', '~&gt; 0.29.1'</code> you use <code class="language-plaintext highlighter-rouge">pod 'SwiftLint', '0.29.1'</code>. If that’s the case, you will end up with exactly the same versions, right? That’s true for the most part. If you specify the versions explicitly, then you will get the same versions. However, if you have 30 dependencies, it can be annoying to update each one manually in turn. Using <a href="https://semver.org">SemVer</a> you can pin compatible versions of each tool, get the most benefits, and then, importantly, just run <code class="language-plaintext highlighter-rouge">pod update</code> and it will resolve the latest possible dependencies and install them, updating your lock file as it goes. So, you don’t have to use a lock file, but it has its advantages.</p>

<p>One additional benefit of using lock files, even if you pin exact versions, depends on your exact tool. Lots of package registries let you change the version already in place. That means that some developer might upload version 1.2.3 of their tool, but realise they made a mistake. Then instead of pushing 1.2.4, they just “fix” 1.2.3. This means that you could have two different versions of 1.2.3. In theory, this shouldn’t happen, but it does (and sometimes maliciously). Using a lock file lets you verify that the version you have is the same as the version others have since the hash of the dependency needs to match. But this depends on your tool.</p>]]></content><author><name>Dale Myers</name></author><category term="programming" /><category term="ci" /><category term="build" /><summary type="html"><![CDATA[Whatever language and package manager you use, be it Ruby Gems, CocoaPods, NPM, Cargo, etc. there’s a good chance that if you have a file specifying your dependencies (such as Gemfile, Podfile, package.json or Cargo.toml), there’s a corresponding .lock file. It’s not always clear what the purpose of these files are, and whether or not they should be checked in to your repo.]]></summary></entry><entry><title type="html">Python Devs: Asking for Forgiveness Is Not Better than Asking for Permission</title><link href="https://myers.io/2018/12/30/forgiveness-vs-permission/" rel="alternate" type="text/html" title="Python Devs: Asking for Forgiveness Is Not Better than Asking for Permission" /><published>2018-12-30T12:53:00+00:00</published><updated>2018-12-30T12:53:00+00:00</updated><id>https://myers.io/2018/12/30/forgiveness-vs-permission</id><content type="html" xml:base="https://myers.io/2018/12/30/forgiveness-vs-permission/"><![CDATA[<p>I recently started working on a Python wrapper to an API which returns JSON. There were a few existing implementations already, but none behaved quite like I wanted, so I set out to write my own. One of the big decisions you make when writing a wrapper around an API in Python is how do you return the data? Let’s say you have an API that returns:</p>

<div class="language-plaintext highlighter-rouge"><div class="highlight"><pre class="highlight"><code>{
    "name": "Hodor",
    "age": 42
}
</code></pre></div></div>

<p>A naive approach might just do something like:</p>

<div class="language-python highlighter-rouge"><div class="highlight"><pre class="highlight"><code><span class="k">def</span> <span class="nf">get_data</span><span class="p">():</span>
    <span class="n">data</span> <span class="o">=</span> <span class="n">requests</span><span class="p">.</span><span class="n">get</span><span class="p">(</span><span class="s">"https://example.com"</span><span class="p">)</span>
    <span class="k">return</span> <span class="n">data</span><span class="p">.</span><span class="n">json</span><span class="p">()</span>
</code></pre></div></div>

<p>Then when you want to access the data, you do:</p>

<div class="language-python highlighter-rouge"><div class="highlight"><pre class="highlight"><code><span class="n">name</span> <span class="o">=</span> <span class="n">data</span><span class="p">[</span><span class="s">'name'</span><span class="p">]</span>
<span class="n">age</span> <span class="o">=</span> <span class="n">data</span><span class="p">[</span><span class="s">'age'</span><span class="p">]</span>
</code></pre></div></div>

<p>This works, it’s simple and it’s easy. It also conforms to one of the unwritten rules of Python: It’s better to ask forgiveness than for permission. i.e. Hope that the values are there, and deal with it if not, rather than checking that they are there first.</p>

<p>Python isn’t the only language I write day to day. It’s shared between it, Swift, Objective-C and C#. One of the features that both Swift and C# have is the ability to deserialize JSON directly into objects. That lets you define an object which looks like the response you expect and it will parse directly into it. Here’s a Swift example:</p>

<div class="language-swift highlighter-rouge"><div class="highlight"><pre class="highlight"><code><span class="kd">struct</span> <span class="kt">Person</span><span class="p">:</span> <span class="kt">Decodable</span> <span class="p">{</span>
    <span class="k">let</span> <span class="nv">name</span><span class="p">:</span> <span class="kt">String</span>
    <span class="k">let</span> <span class="nv">age</span><span class="p">:</span> <span class="kt">Int</span>
<span class="p">}</span>

<span class="k">guard</span> <span class="k">let</span> <span class="nv">person</span> <span class="o">=</span> <span class="k">try</span><span class="p">?</span> <span class="kt">JSONDecoder</span><span class="p">()</span><span class="o">.</span><span class="nf">decode</span><span class="p">(</span><span class="kt">Person</span><span class="o">.</span><span class="k">self</span><span class="p">,</span> <span class="nv">from</span><span class="p">:</span> <span class="n">responseData</span><span class="p">)</span> <span class="k">else</span> <span class="p">{</span>
    <span class="nf">print</span><span class="p">(</span><span class="s">"Error: Couldn't decode data into Person"</span><span class="p">)</span>
    <span class="k">return</span>
<span class="p">}</span>

<span class="nf">print</span><span class="p">(</span><span class="n">person</span><span class="o">.</span><span class="n">name</span><span class="p">)</span>
<span class="nf">print</span><span class="p">(</span><span class="n">person</span><span class="o">.</span><span class="n">number</span><span class="p">)</span>
</code></pre></div></div>

<p>This pulls out the data, type checks it and places it into a newly created object for you. This implementation lets you handle missing keys by using optional types, you can specify alternative identifier mappings if you want your property to be named differently than the API key, etc. You can be sure that whatever comes back from the API definitely conforms to <code class="language-plaintext highlighter-rouge">Person</code>. C# has a very similar ability using the <a href="https://www.newtonsoft.com/json">Json.NET</a> library.</p>

<p>So, how did I want to return the data from my library? Well, I decided that if I could parse it into an object, perform the validation, type checking, etc. this would result in a safer library for users to consume. There would be less surprises in store, and it would be easier to use. So I started writing out my Python code to handle this:</p>

<div class="language-python highlighter-rouge"><div class="highlight"><pre class="highlight"><code><span class="k">class</span> <span class="nc">Person</span><span class="p">:</span>

    <span class="k">def</span> <span class="nf">__init__</span><span class="p">(</span><span class="bp">self</span><span class="p">,</span> <span class="n">name</span><span class="p">,</span> <span class="n">age</span><span class="p">):</span>
        <span class="bp">self</span><span class="p">.</span><span class="n">name</span> <span class="o">=</span> <span class="n">name</span>
        <span class="bp">self</span><span class="p">.</span><span class="n">age</span> <span class="o">=</span> <span class="n">age</span>

    <span class="o">@</span><span class="nb">staticmethod</span>
    <span class="k">def</span> <span class="nf">from_json</span><span class="p">(</span><span class="n">json_data</span><span class="p">):</span>
        <span class="n">name</span> <span class="o">=</span> <span class="n">json_data</span><span class="p">.</span><span class="n">get</span><span class="p">(</span><span class="s">'name'</span><span class="p">)</span>
        <span class="n">age</span> <span class="o">=</span> <span class="n">json_data</span><span class="p">.</span><span class="n">get</span><span class="p">(</span><span class="s">'age'</span><span class="p">)</span>

        <span class="k">if</span> <span class="n">name</span> <span class="ow">is</span> <span class="bp">None</span><span class="p">:</span>
            <span class="k">raise</span> <span class="nb">Exception</span><span class="p">(</span><span class="s">'No "name" was found in the data'</span><span class="p">)</span>

        <span class="k">if</span> <span class="n">age</span> <span class="ow">is</span> <span class="bp">None</span><span class="p">:</span>
            <span class="k">raise</span> <span class="nb">Exception</span><span class="p">(</span><span class="s">'No "age" was found in the data'</span><span class="p">)</span>

        <span class="k">if</span> <span class="ow">not</span> <span class="nb">isinstance</span><span class="p">(</span><span class="n">name</span><span class="p">,</span> <span class="nb">str</span><span class="p">):</span>
            <span class="k">raise</span> <span class="nb">Exception</span><span class="p">(</span><span class="s">'"name" was not a string'</span><span class="p">)</span>

        <span class="k">if</span> <span class="ow">not</span> <span class="nb">isinstance</span><span class="p">(</span><span class="n">age</span><span class="p">,</span> <span class="nb">int</span><span class="p">):</span>
            <span class="k">raise</span> <span class="nb">Exception</span><span class="p">(</span><span class="s">'"age" was not an int'</span><span class="p">)</span>

        <span class="k">return</span> <span class="n">Person</span><span class="p">(</span><span class="n">name</span><span class="p">,</span> <span class="n">age</span><span class="p">)</span>

<span class="n">person</span> <span class="o">=</span> <span class="n">Person</span><span class="p">.</span><span class="n">from_json</span><span class="p">(</span><span class="n">json_data</span><span class="p">)</span>
</code></pre></div></div>

<p>Phew… that’s a lot of boilerplate, but it gets the job done (lets not get into namedtuples, dataclasses, etc.). It checks that the values are there. It checks that they are the correct type. The end result is a nice, safe and clean type that the user can use without any surprises.</p>

<p>The problem is that I am explicitly checking, rather than letting the user handle it if it goes wrong, and this goes against the rule I mentioned above. However, clearly when writing an API wrapper, the burden of validating the responses is on the wrapper and not the end user. This clearly shows that the permission vs forgiveness rule is not right in all cases<sup id="fnref:1" role="doc-noteref"><a href="#fn:1" class="footnote" rel="footnote">1</a></sup>. This is just one case though, there are many others.</p>

<p>So, Python devs, before you repeat the line about permission and forgiveness, pause for a moment and actually think about it. Is that actually what’s best, or is it just something you’ve believed without knowing why?</p>

<h4 id="a-better-solution-for-the-above">A better solution for the above</h4>

<p>The code above is ridiculously verbose and it’s just checking two properties. I was dealing with a lot more. The validation code got insane. That doesn’t even include the ones where I wanted to do things like convert a Unix timestamp to a <code class="language-plaintext highlighter-rouge">datetime.datetime</code>, etc. Inspired by the Swift and C# solutions, I went and created <a href="https://github.com/dalemyers/deserialize">deserialize</a><sup id="fnref:2" role="doc-noteref"><a href="#fn:2" class="footnote" rel="footnote">2</a></sup> which takes advantage of type hints. By using this, the solution above can be condensed to:</p>

<div class="language-python highlighter-rouge"><div class="highlight"><pre class="highlight"><code><span class="kn">import</span> <span class="nn">deserialize</span>

<span class="k">class</span> <span class="nc">Person</span><span class="p">:</span>
    <span class="n">name</span><span class="p">:</span> <span class="nb">str</span>
    <span class="n">age</span><span class="p">:</span> <span class="nb">int</span>

<span class="n">person</span> <span class="o">=</span> <span class="n">deserialize</span><span class="p">.</span><span class="n">deserialize</span><span class="p">(</span><span class="n">Person</span><span class="p">,</span> <span class="n">json_data</span><span class="p">)</span>
</code></pre></div></div>

<p>That does all the same checks as above, but is obviously much easier to read and maintain. It also lets me continue working on the wrapper without feeling like my soul is being sucked out as I validate the 400th value.</p>

<div class="footnotes" role="doc-endnotes">
  <ol>
    <li id="fn:1" role="doc-endnote">
      <p>Even the creator of Python thinks that it is a bad rule: <a href="https://mail.python.org/pipermail/python-dev/2014-March/133118.html">https://mail.python.org/pipermail/python-dev/2014-March/133118.html</a> <a href="#fnref:1" class="reversefootnote" role="doc-backlink">&#8617;</a></p>
    </li>
    <li id="fn:2" role="doc-endnote">
      <p>I initially looked for an existing library that did the same thing, but couldn’t find one. Sure enough though, as soon as I had something that did what I needed, I found what I was looking for in the first place: <a href="https://git.iapc.utwente.nl/rkleef/serializer_utils">https://git.iapc.utwente.nl/rkleef/serializer_utils</a> Don’t just blindly go with my implementation. Have a look at both solutions and use the correct one for you. <a href="#fnref:2" class="reversefootnote" role="doc-backlink">&#8617;</a></p>
    </li>
  </ol>
</div>]]></content><author><name>Dale Myers</name></author><category term="python" /><category term="deserialize" /><category term="programming" /><summary type="html"><![CDATA[I recently started working on a Python wrapper to an API which returns JSON. There were a few existing implementations already, but none behaved quite like I wanted, so I set out to write my own. One of the big decisions you make when writing a wrapper around an API in Python is how do you return the data? Let’s say you have an API that returns:]]></summary></entry><entry><title type="html">Stop Suggesting Git Aliases</title><link href="https://myers.io/2018/02/22/stop-suggesting-git-aliases/" rel="alternate" type="text/html" title="Stop Suggesting Git Aliases" /><published>2018-02-22T12:00:00+00:00</published><updated>2018-02-22T12:00:00+00:00</updated><id>https://myers.io/2018/02/22/stop-suggesting-git-aliases</id><content type="html" xml:base="https://myers.io/2018/02/22/stop-suggesting-git-aliases/"><![CDATA[<p>Sometimes it feels like every second day there is a post on Hacker News or Reddit about great new git aliases that you totally need today, and if you don’t you’re the devil. To users who have just gotten to grips with git, these can seem like the coolest new thing to have. How do I know this? Because I fell for it when I was in that situation.</p>

<p>Git is one of the most difficult tools for people to wrap their heads around. Interspersed with the git alias blog posts (yes, I do love irony, why do you ask?) are the git tutorial posts. Sure, years on it all makes sense to us, but for beginners, understanding what each command does is the most important thing.</p>

<p>Aliases break that. Well, that’s not true. YOUR aliases break that. Here are 4 different categories of alias and reasons why each are bad.</p>

<p>The first is the set of typing savers:</p>

<p><code class="language-plaintext highlighter-rouge">git p</code> -&gt; <code class="language-plaintext highlighter-rouge">git pull</code><br />
<code class="language-plaintext highlighter-rouge">git co</code> -&gt; <code class="language-plaintext highlighter-rouge">git checkout</code></p>

<p>These teach new users to use these commands rather than the real ones. When it comes to learning about something else, there is a separation between the commands they are learning how to use more effectively and the commands that they know how to use. It can be difficult to reconcile that <code class="language-plaintext highlighter-rouge">pull</code> is <code class="language-plaintext highlighter-rouge">p</code> each time you see it. Sticking with the original commands, at least until you are quite comfortable with git teaches you how to think about it in a consistent way which is supported by the rest of the community.</p>

<p>In slot number 2 we have the aliases which string multiple commands together:</p>

<p><code class="language-plaintext highlighter-rouge">git cm</code> -&gt; <code class="language-plaintext highlighter-rouge">git add -A &amp;&amp; git commit -m</code><br />
<code class="language-plaintext highlighter-rouge">git cp</code> -&gt; <code class="language-plaintext highlighter-rouge">git commit &amp;&amp; git push</code></p>

<p>These commands can simplify the flow for beginners, I won’t deny that. But they do it at a cost. In this case, it can be difficult to reason about what is going on under the hood when a user runs <code class="language-plaintext highlighter-rouge">git cp</code>. It doesn’t force you to face the idea of there being a staging area, committed code and pushed code. Instead, it treats it more like SVN does, where you have changes locally or you have them on the server. It ties up the usefulness of git into a less functional wrapper, and makes it harder to learn the individual components.</p>

<p>For number 3, we have the commands which provide flags to existing commands:</p>

<p><code class="language-plaintext highlighter-rouge">git rbc</code> -&gt; <code class="language-plaintext highlighter-rouge">git rebase --continue</code><br />
<code class="language-plaintext highlighter-rouge">git fix</code> -&gt; <code class="language-plaintext highlighter-rouge">git commit --amend --reset-author --no-edit</code></p>

<p>This is the hardest to argue against. The flags can be hard to remember. That’s a fact. Having aliases helps with these. In this case though, it takes from you the configuration possibilities, as well as understanding of individual components as above. The <code class="language-plaintext highlighter-rouge">fix</code> command for example makes it easy to make a change and roll it into the previous commit. However, without the flags, you don’t really understand the mechanism by which it does this. Not to mention the fact that if you are ever on a machine without your aliases, you’ll have no idea what you are doing.</p>

<p>The final category is workflow specific aliases:</p>

<p><code class="language-plaintext highlighter-rouge">git up</code> -&gt; <code class="language-plaintext highlighter-rouge">git pull --rebase --prune $@ &amp;&amp; git submodule update --init --recursive</code><br />
<code class="language-plaintext highlighter-rouge">git wip</code> -&gt; <code class="language-plaintext highlighter-rouge">git add -A; git ls-files --deleted -z | xargs -0 git rm; git commit -m "wip"</code><br />
<code class="language-plaintext highlighter-rouge">git unwip</code> -&gt; <code class="language-plaintext highlighter-rouge">git log -n 1 | grep -q -c wip &amp;&amp; git reset HEAD~1</code></p>

<p>Each of these are tailored to a specific person or teams workflow. They may not be useful to a new user and pushing them to use it is giving them a nice shiny new hammer and saying “Look at all these things which can be treated like nails!”. A user needs to decide their own flow. Git lets you customise it with aliases so you can adapt your tooling to your flow. It’s a terrible idea to ignore all that and make your flow fit someone else’s tools when you have your own ones.</p>

<p>So, I’m not against git aliases. In fact, 2 of the aliases above are from my own config files. What I’m against is confusing users with new things, and hiding the truth from them. Once a user has used git on it’s own and understands their own flow, that knowledge, combined with the knowledge that you can add lines like:</p>

<div class="language-plaintext highlighter-rouge"><div class="highlight"><pre class="highlight"><code>alias_name = some_sub_command -with -flags
other_alias = !git whatever | other_command
</code></pre></div></div>

<p>is enough for them to build their own tools, customised to their own knowledge that suit their own flows.</p>

<p>Let users learn their own aliases.</p>

<p>P.S. Except log aliases. Share those as much as you want. No one is going to remember how to write those each time.</p>]]></content><author><name>Dale Myers</name></author><category term="git" /><summary type="html"><![CDATA[Sometimes it feels like every second day there is a post on Hacker News or Reddit about great new git aliases that you totally need today, and if you don’t you’re the devil. To users who have just gotten to grips with git, these can seem like the coolest new thing to have. How do I know this? Because I fell for it when I was in that situation.]]></summary></entry><entry><title type="html">1Password is About to Lose a Lot of Customers</title><link href="https://myers.io/2017/07/10/1password-is-about-to-lose-a-lot-of-customers/" rel="alternate" type="text/html" title="1Password is About to Lose a Lot of Customers" /><published>2017-07-10T13:00:00+01:00</published><updated>2017-07-10T13:00:00+01:00</updated><id>https://myers.io/2017/07/10/1password-is-about-to-lose-a-lot-of-customers</id><content type="html" xml:base="https://myers.io/2017/07/10/1password-is-about-to-lose-a-lot-of-customers/"><![CDATA[<p>Almost 2 years ago I wrote a post calling out AgileBits on the fact that
1Password was leaking metadata. I pointed out that while they aren’t leaking
passwords, there mere existence of accounts is enough to cause problems for many
people. This flaw was with their older keychain format, and my main issue wasn’t
with the flaw, but the fact that they weren’t encouraging people to move to the
new format which didn’t have the issue. Despite this, I was still happy with the
security of the product and I had faith in the company. Today, that no longer
applies.</p>

<p>A few weeks ago a
<a href="https://blog.agilebits.com/2017/06/20/introducing-1password-6-6-for-windows/">post</a>
appeared on the 1Password blog. It didn’t received much traction until today
though. Essentially, the post lays out a new version of 1Password for Windows
which will make the current file formats read only and force the user to pay a
subscription fee to store their passwords on 1Password’s servers. Now, I want to
make it abundantly clear that I don’t have a problem with their fee model being
subscription based. In fact, I practically welcome it. I paid for 1Password 3 or
4 years ago and got a licence for Windows, OS X, Android and iOS. I gave them
something like £80 for all that, once. This is a company who I trust with my
security. I don’t want them to be scraping by and trying to figure out how to
pay their employees. I don’t want them cutting corners in order to get sales.
Keeping the company healthy is in my best interests as a user. A subscription
model would guarantee income for them, and would help me sleep a little easier
at night.</p>

<p>So where is my problem? It’s the fact that I no longer have control over my
vault. My passwords will automatically be synced to 1Passwords servers and will
no longer be in my control. “But your passwords are encrypted before being sent
to them!” I hear you cry. Sure, I’m not denying that. I have faith that
AgileBits have implemented this mechanism safely and securely. The problem isn’t
my passwords on their servers. It’s everyone’s.</p>

<p>Servers full of passwords are wonderful targets for thieves. Now imagine servers
full of password vaults. What Fort Knox is to a bank robber, 1Password’s servers
will be to black hats. AgileBits have just painted a target on their backs and
don’t even realise it.</p>

<p>So let’s say that someone does compromise their servers (I said I had faith in
        AgileBits, but no one writes perfect code all the time), what happens
next? I have a strong master password, so I know that my passwords would be
safe. But what about the thousands of people who <em>don’t</em> have strong master
passwords? Their vaults are essentially ripe for the picking. Now, they do have
a secret key which is said to never leave your device and your encryption key is
derived from your master password <em>and</em> your secret key. This is a great feature
that I don’t want to put down. However, if you are a black hat, have 100,000
password vaults, 10% of which have weak passwords, and no secret keys, what do
you do? You start working on getting those keys. If a user is using a weak
master password, you can almost certainly assume their general security habits
aren’t great. A targeted attack on any of these people would have a high chance
of success.</p>

<p>Ok, enough about the security. What else is wrong with this approach? Well, for
a start, I now <em>must</em> have a network connection in order to be able to add my
1Password vault to a machine. I can’t keep it on a USB drive and use that on
each machine. If someone has an air-gapped machine, then it’s no use.</p>

<p>Next up is the fact that if I want to continue getting updates, some of which
might be critical for security, I need to upgrade, which means my vault is made
read-only. I might be left with a choice of being secure, and being able to use
my password manager. I can’t speak for everyone, but it really feels like I’m
being left out in the cold on this one.</p>

<p>The final thing is the worst. It’s the fact that it really seems like AgileBits
just doesn’t care about it’s users any more. I would guess that a significant
number of people (myself included) use 1Password over competitors like LastPass
or DashLane <em>because</em> it doesn’t sync to a central server. This feels like a
money grab rather than something that has been done to make their users happier.
As I mentioned, I’m fine with a subscription for the licence, just please leave
me in control of my passwords.</p>]]></content><author><name>Dale Myers</name></author><category term="1password" /><category term="password managers" /><category term="security" /><summary type="html"><![CDATA[Almost 2 years ago I wrote a post calling out AgileBits on the fact that 1Password was leaking metadata. I pointed out that while they aren’t leaking passwords, there mere existence of accounts is enough to cause problems for many people. This flaw was with their older keychain format, and my main issue wasn’t with the flaw, but the fact that they weren’t encouraging people to move to the new format which didn’t have the issue. Despite this, I was still happy with the security of the product and I had faith in the company. Today, that no longer applies.]]></summary></entry><entry><title type="html">The Joel Test for 2017</title><link href="https://myers.io/2017/04/04/the-joel-test-for-2017/" rel="alternate" type="text/html" title="The Joel Test for 2017" /><published>2017-04-04T20:00:00+01:00</published><updated>2017-04-04T20:00:00+01:00</updated><id>https://myers.io/2017/04/04/the-joel-test-for-2017</id><content type="html" xml:base="https://myers.io/2017/04/04/the-joel-test-for-2017/"><![CDATA[<p>Back in 2013, I took a course on “Software Architecture, Process, and Management”. One of the topics which came up was: How do you rate a development team? It’s not a simple challenge, and to get a full answer would take a considerable investigation and a lengthy report at the end. Thankfully, Joel Spolsky came up with a simple 12 question test to make this process relatively painless, named “<a href="https://www.joelonsoftware.com/2000/08/09/the-joel-test-12-steps-to-better-code/">The Joel Test</a>”. The test isn’t perfect, and doesn’t claim to be, but what it does give you is a solid basis to work from to find out those last few details.</p>

<div class="language-plaintext highlighter-rouge"><div class="highlight"><pre class="highlight"><code>1. Do you use source control?
2. Can you make a build in one step?
3. Do you make daily builds?
4. Do you have a bug database?
5. Do you fix bugs before writing new code?
6. Do you have an up-to-date schedule?
7. Do you have a spec?
8. Do programmers have quiet working conditions?
9. Do you use the best tools money can buy?
10. Do you have testers?
11. Do new candidates write code during their interview?
12. Do you do hallway usability testing?
</code></pre></div></div>

<p>The beauty of the Joel test is that in a relatively small number of yes or no questions, you can get the answers you are looking for. There are no exceptions or caveats that need to be taken into account, it’s purely yes or no to each question and you have your results. A score of 12 is perfect, 11 tolerable and 10 or less is a failure. This beauty did not go unnoticed by me or by a few of my fellow students. I quickly used it to gauge the quality of companies I was interviewing at for internships and later for my first job out of university. Most employers had never heard of the test, which wasn’t surprising. What <em>was</em> surprising was how many companies, which I had previously thought were good, failed the test.</p>

<p>Was I getting the questions wrong? Was I not making them clear? Maybe I just couldn’t count properly all the way to twelve?</p>

<p>The test which I had been told was effectively the holy grail of questions in response to “Is there anything you’d like to ask us?”, was effectively a failure to me. Sure, it might just be that all the companies I interviewed at were terrible, but despite being new to the software world, I had a feeling that wasn’t the case. While I did take the test into consideration for my various applications, it was never a deciding factor for anywhere.</p>

<p>So what went wrong with the Joel test for me?</p>

<p>Each programmer is different. They will have different views about what is good and what is bad, and these views will change over time. The Joel test tries to be unbiased in this and asks objective questions, rather than subjective ones. No programmer out there is going to disagree that tracking bugs is a good idea. But what about some of the other questions?</p>

<p>Created in 2000, the Joel test is now 17 years old. The test is older than OS X. When it was created, Windows 2000 was state of the art, the Playstation 2 had just been released, and Pentium III chips were whizzing along at 1GHz. In the computing world, it was an eternity ago. As power of computer processors (and generally hardware) was doubling every 18 months, our development processes were improving too. The questions in the Joel test reflected the epitome of software development at the time. In 2017 though, they just aren’t quite as relevant.</p>

<p>Taking question #1 as an example:</p>

<blockquote>
  <p>Do you use source control?</p>
</blockquote>

<p>At the time this was written Git, today’s most popular VCS, didn’t exist. Well sure, we all know that Git didn’t appear on the scene until 2005. What’s easy to forget is that Subversion, the previous King of the VCS world, wasn’t released until October 2000. That’s 2 months after the Joel test was originally published. Source control existed, but it was in no way as common as it is today. Does that mean that we should even bother asking this question any more? Perhaps. Should we modify the question to better suit today’s world? Probably.</p>

<p>Let’s take a look at each question in turn to see how it fits into today’s world.</p>

<h3 id="1-do-you-use-source-control">1. Do you use source control?</h3>

<p>Despite picking on it above, this question still seems relevant in today’s world. All teams <em>should</em> use source control, there is no reason not to. Today’s debates revolve around whether we should be using a distributed VCS or not. Normal projects can use Git or Mercurial (as examples) just fine. Larger companies with enormous repositories find that they need to use a centralised version control system. There isn’t a right or wrong answer to this. What’s important is that version control is used. However, given that this is so common, I’m not convinced that this question has a place today.</p>

<p><em>Proposed update:</em> Remove rule.</p>

<h3 id="2-can-you-make-a-build-in-one-step">2. Can you make a build in one step?</h3>

<p>Joel clarifies this one by stating:</p>

<blockquote>
  <p>By this I mean: how many steps does it take to make a shipping build from the latest source snapshot?</p>
</blockquote>

<p>The reasoning behind it still rings true today. However, I do feel that this is our first contender for an out of date question. I’d propose that making a build should be done in <em>zero</em> steps. Continuous integration now exists and and is ubiquitous. It is wise, and indeed sane, to use it. The process of creating a ship build should be that they commit their code, and then when management, or whoever is responsible, decides to release, they press a “release” button, and that’s it. All developers need to do is make sure their code is committed and the CI server takes care of the rest.</p>

<p>CI has brought the development industry forward by leaps and bounds. It can carry us even further if we all use it, and use it to its fullest potential.</p>

<p><em>Proposed update:</em> Are all builds handled automatically by a Continuous Integration server?</p>

<h3 id="3-do-you-make-daily-builds">3. Do you make daily builds?</h3>

<p>This follows on with #2. Daily builds are fine if that’s what works for your team. I’d say that daily should be the minimum bar though. A better approach, in my eyes, is to make sure that builds are created for each commit to your main development branch. This is a sort of “bleeding edge” kind of build, but it means you will find your issues faster, and more effectively since it’s easier to pin down the version when something broke.</p>

<p>This build should be done by your CI. There is a second factor to this though. Not only should you make daily builds, but you should <em>use</em> them as well. This is, admittedly, harder when you work on software which isn’t related to your day to day life (either personally or professionally). In the case where you write an accounting app, or a controller for a rocket, it’s unlikely that you will need to use these products. However, I think it’s a good idea to sit down with your software for at least 20 minutes a day and just use it, making sure that everything still works. In the case where you do work on something you can use<sup id="fnref:using_outlook" role="doc-noteref"><a href="#fn:using_outlook" class="footnote" rel="footnote">1</a></sup> day to day, this is even better. It fulfils the same role as a 20 minute session, but in practice, you are going to do a lot more than 20 minutes of testing, and will expose the project to more real-world scenarios.</p>

<p><em>Proposed update:</em> Do you make and use daily builds?</p>

<h3 id="4-do-you-have-a-bug-database">4. Do you have a bug database?</h3>

<p>Well of course you should use a bug database of some kind. Have you ever met a developer who thinks that you shouldn’t? Where this one changes is that today our bug trackers are a lot more fully featured. No longer are they just simple interfaces to a table in a database, they are full featured planning and management applications, often with a key distinction between tasks and bugs (a sneak peek at #5).</p>

<p>When you create a bug today, you give it a title, description, repro steps, affected platforms, etc. just as you’ve always done. Where it goes differently, is that now, management are going to go through your bugs, assign them to sprints, you are going to move things around on a Kanban board, your Scrum master is going to have conversations with you about difficult tickets, etc.</p>

<p>These issue trackers are no longer just about keeping a record of <em>what</em> needs done. They are about who does it, how it affects the team, what effect it has on the product and a hundred other variables. Now, while I believe you should have some sort of software that can do this, it isn’t essential that it is one and the same with your issue tracker. Nor is it something which gives a simple yes or no answer due to the fact that every team is different. The only minor change I’d make, is to word it slightly differently to reflect the capabilities that we have today.</p>

<p><em>Proposed update:</em> Do you use an issue tracker?</p>

<h3 id="5-do-you-fix-bugs-before-writing-new-code">5. Do you fix bugs before writing new code?</h3>

<p>Joel has a great explanation of why this is so important, and 17 years on, it still holds true.</p>

<p><em>Proposed update:</em> N/A</p>

<h3 id="6-do-you-have-an-up-to-date-schedule">6. Do you have an up-to-date schedule?</h3>

<p>As a developer, you might not care so much about this. Why does it matter if your team doesn’t meet your deadline? It wasn’t your fault? Leave this to management.</p>

<p>Leaving it to management might work, but it probably won’t. Today, with the various different agile methodologies we have, getting estimates from developers, or at least someone who is capable of calculating a reasonable estimate, is one of the key factors in planning. It helps prioritise what the team is going to work on, who is going to do it, and when they are going to do it. You can stick your fingers in your ears and pretend that it has nothing to do with you, but at the end of the day, each and every developer has a responsibility to the team.</p>

<p>Does it still hold today though? Definitely. Sure, we don’t use waterfall any longer, and making sure we hit that testing phase on time doesn’t make much sense any longer, but even in agile (which lots of people believe to mean “making it up as we go along”), and indeed, <em>especially</em> in agile, the schedule is the master and needs to be kept up to date. The difference today is that the schedule can change to accommodate new information.</p>

<p><em>Proposed update:</em> N/A</p>

<h3 id="7-do-you-have-a-spec">7. Do you have a spec?</h3>

<p>While the schedule rule may have passed through unscathed, the same thing can’t be said for the spec unfortunately. In the waterfall days, the spec was crucial as you needed to know what you were building. If you didn’t you couldn’t allocate resources effectively, and your project was, effectively, doomed to failure.</p>

<p>Back in 2001, when you created your program, whether it be for a coffee maker, a rocket, or a just a straight forward CRUD interface, you knew what had to be done, and how much would it would take to do it approximately. Developers, testers and PMs were assigned, they worked through it all, tested, and shipped, before moving on to the next project. Today though, things are a little different in a lot of cases. Sure, if you are making any of the above, things are still similar, but what about if you are writing a Twitter client? Or a text editor? Maybe even an email client? Are any of these ever “done”? Usually not.</p>

<p>A spec works when you can get all the information up front, and plan things out. When you are working on a continual piece of software, the spec is just as important for your MVP, but after that it is effectively useless. In order for the spec to be as important in today’s world, you need to make sure that you are continually taking into account the latest information and adjusting your process and product accordingly.</p>

<p>This information can take many forms. It might just be simple telemetry about what people are doing with the app, or it could, and possibly should, be more advanced, such as the results of A/B testing new features and designs.</p>

<p><em>Proposed update:</em> Do you have up to date information on your products performance and usage?</p>

<h3 id="8-do-programmers-have-quiet-working-conditions">8. Do programmers have quiet working conditions?</h3>

<p>Images of software development in the 80s and 90s bring to mind a sea of cubicles. Today, the result is pretty similar, the only difference is that the dividers are often much smaller, or missing entirely, in the interests of having an “open” office.</p>

<p>Personally, I’m not a fan of the open office. I like having an office of my own where I can have dedicated development time, I can personalise it how I like, and I can turn up my music when I want to get into the zone. However, not everyone agrees with me. I know many people who like the idea of open offices. They promote more effective and direct communication between members of a team, often leading to faster and better solutions to problems.</p>

<p>The rule though asks about quiet working conditions, not solitary ones. Open offices, by their very nature, tend to be noisier than having your own office. When asked about the noise issues of open offices, the usual response is to just wear headphones. With noise cancelling technology, this is a reasonable fix in most cases, and the one I use often when I’m in a shared office.</p>

<p>Like it or not, quiet working conditions are generally tied to having your own office vs having an open office. There is no right or wrong answer for which is correct.</p>

<p><em>Proposed update:</em> Remove rule</p>

<h3 id="9-do-you-use-the-best-tools-money-can-buy">9. Do you use the best tools money can buy?</h3>

<p>This rule was the hardest to come to a decision on. I actually ended up writing most of the rest of this post before coming back and deciding on this one.</p>

<p>The issue that I had with it is that often, companies can’t afford the best tools money can buy. Just because they can’t today, doesn’t mean they won’t be able to tomorrow. However, I think the spirit of the rule still stands. It’s the duty of the company to make the lives of the developers as easy and as happy as possible. Happy and unstressed developers product better code.</p>

<p>One key point though to remember about this is that this does not mean that money needs to be thrown at the problem. If the best tool is free, then that’s the one that should be used.</p>

<p><em>Proposed update:</em> N/A</p>

<h3 id="10-do-you-have-testers">10. Do you have testers?</h3>

<p>Testers are an area that every company does differently. A couple of years ago, between when I was an intern and when I went full time, Microsoft <a href="https://www.quora.com/Why-is-Microsoft-merging-its-SDE-and-SDET-positions-into-the-software-engineer-title">merged the engineer and tester roles</a>. I originally wrote about why I thought that merging testers and developers was a good thing due to the resources I wasted as an intern, and how removing the safety net of testers encouraged me to write better code. Now, that was true for Microsoft, but let’s look at what Joel has to say about this:</p>

<blockquote>
  <p>If your team doesn’t have dedicated testers, at least one for every two or three programmers, you are either shipping buggy products, or you’re wasting money by having $100/hour programmers do work that can be done by $30/hour testers.</p>
</blockquote>

<p>The main difference between how I viewed this and how Joel does is that at Microsoft, testers and developers were equal. Developers weren’t getting paid 3 times as much as testers. The time a tester spent going over changes, and making sure fixes worked, and didn’t introduce problems, was just as valuable as a developers time. However, it still felt like a safety net.</p>

<p>Having testers is a great thing, but Joel makes the best point, and that is make sure you aren’t wasting the value of your testers.</p>

<p>Developers need to take on the responsibility for their own code. If you aren’t very confident that you code is bug free, it shouldn’t be checked in. That means you need to run manual tests, unit tests, integration tests, etc. You aren’t going to be checking in code without going through code review, so why check in without going through tests?</p>

<p>Testers don’t need to go through each and every change, but they do need to make sure the product as a whole is still stable. They should be able to spend their time going through a test matrix that is far larger than would be worth a developer doing. Having testers isn’t they key, having a comprehensive and efficient test plan is.</p>

<p><em>Proposed update:</em> Do you have a comprehensive test plan?</p>

<h3 id="11-do-new-candidates-write-code-during-their-interview">11. Do new candidates write code during their interview?</h3>

<p>If you were to search for the keyword “interview” on various development sites, such as Hacker News, or some sub-reddits, how many of these resulting articles would have something positive to say about the process? Very few. Everyone is aware that the current interview system is broken and we need a better one. Until the time that someone can come up with one, assuming that a single one exists, which is unlikely, we need to work with what we have.</p>

<p>There are a few different ways of handing interviews currently:</p>

<ol>
  <li>Solve some problems on a whiteboard</li>
  <li>Do this homework project.</li>
  <li>Come and work with us for 6 months on probation.</li>
</ol>

<p>The thing that they all have in common is that the developer is expected to write code. If that’s what their job is going to be, that’s what you should test them on. Don’t penalise them for getting the syntax of a particular operation wrong, or not choosing the language that your team works in, but make sure they can write code.</p>

<p>As we have seen before though, this one is so ubiquitous that I don’t think it’s worth including any longer.</p>

<p><em>Proposed update:</em> Remove rule.</p>

<h3 id="12-do-you-do-hallway-usability-testing">12. Do you do hallway usability testing?</h3>

<p>As one of the lesser known rules, let’s take a look at Joel’s definition:</p>

<blockquote>
  <p>A hallway usability test is where you grab the next person that passes by in the hallway and force them to try to use the code you just wrote. If you do this to five people, you will learn 95% of what there is to learn about usability problems in your code.</p>
</blockquote>

<p>Now, you aren’t going to hear any argument from me that hallway usability testing is a good thing, but things have come a long way from four thousand grey buttons on a grey tool bar, in a grey window on a grey desktop. People who use computers (which has a very wide range of definitions these days), aren’t necessarily well versed in how they work. For specialised tools, having what you need at your finger tips with buttons, drop-downs, keyboard shortcuts, etc. is still great. For Facebook however, your grandparents need to be able to use it. It needs to have a clear design, with high contrast between elements, have interaction points located in sensible places, and be suitably sized.</p>

<p>Creating a user interface and experience of any kind, and by that I don’t just mean the regular UI, but making sure things like saving a file are handled in a sensible manner, is no longer something that any developer can do, or should be expected to do. It is now a specialised skill, which should be handled by dedicated UI and UX designers.</p>

<p><em>Proposed update:</em> Do you have dedicated UI and UX designers?</p>

<h2 id="review-of-the-joel-test">Review of the Joel Test</h2>

<p>So, let’s see what our test now looks like:</p>

<div class="language-plaintext highlighter-rouge"><div class="highlight"><pre class="highlight"><code>1. Are all builds handled automatically by a Continuous Integration server? 
2. Do you make and use daily builds? 
3. Do you use an issue tracker?
4. Do you fix bugs before writing new code?
5. Do you have an up-to-date schedule?
6. Do you have up to date information on your products performance and usage?
7. Do you use the best tools money can buy?
8. Do you have a comprehensive test plan?
9. Do you have dedicated UI and UX designers?
</code></pre></div></div>

<p>We’ve cut a few rules, and improved others. But we aren’t done yet. This was how we can change the existing test to be more suitable for modern development, but we need to add in new rules that matter today.</p>

<h2 id="new-rules">New Rules</h2>

<h3 id="does-all-code-go-through-code-review">Does all code go through code review?</h3>

<p>Everyone makes mistakes. It doesn’t matter if you are fresh out of school or a war hardened veteran of software, you will make mistakes. All too often we depend on the compiler to tell us about our mistakes, and that’s not how it works. That’s why we test. But testing is fallible too. We can’t rely 100% on it either. Having a fresh pair of eyes on your code will see things that you simply didn’t see. Further more, they can help you make sure your code follows your teams style, which is something your compiler can’t do (linters are a topic for a different time). Having consistent code helps others on your team read and use your code.</p>

<h3 id="do-you-have-coding-standards">Do you have coding standards?</h3>

<p>This one goes hand in hand with the one above. Writing code is all well and good, but the trick is that you need to be able to read it again. Unfortunately, this isn’t always the case, and we should do what we can to ensure that code is as easy to read as possible. The number one way of doing that, is ensuring the code is consistent in the code base. By having a set of standards which the team must adhere to, it makes it much easier to read and understand code, search through the code base for particular components, types, etc., and helps new developers get up to speed by clearly defining the style expected of them, rather then forcing them to figure it out as they go. This can also be paired with a linter in your CI system to enforce the standards.</p>

<h3 id="are-new-employees-given-training">Are new employees given training?</h3>

<p>It seems obvious, but it just isn’t in lots of places. Many new developers join a company and get thrown in at the deep end. This process is a waste of time for the developer and the company. Some will manage to swim, but most will sink. When you join a company, you should be given the information you require to do your job. Now, I’m not saying that you should be sat down in a conference room for a week to sit through HR sessions and proclamations from VPs, and in fact I hope that this isn’t the case, but you should be given the documentation for the system you work on, and have someone already on your team assigned as a mentor for a reasonable time period so that you can get up to speed as quickly as possible. Yes, that means that the other developer will have a lower output during the training session, but after that you get <em>two</em> developers, so anyone who can do basic arithmetic can see that it is a worthwhile investment.</p>

<h2 id="conclusion">Conclusion</h2>

<p>So, lets see what our new “Joel Test” for 2017 looks like:</p>

<div class="language-plaintext highlighter-rouge"><div class="highlight"><pre class="highlight"><code>1. Are all builds handled automatically by a Continuous Integration server? 
2. Do you make and use daily builds? 
3. Do you use an issue tracker?
4. Do you fix bugs before writing new code?
5. Do you have an up-to-date schedule?
6. Do you have up to date information on your products performance and usage?
7. Do you use the best tools money can buy?
8. Do you have a comprehensive test plan?
9. Do you have dedicated UI and UX designers?
10. Does all code go through code review?
11. Do you have coding standards?
12. Are new employees given training?
</code></pre></div></div>

<p>It’s perfect! We shall all use it indiscriminately and rejoice.</p>

<p>Except no… The test isn’t a panacea. It’s just a guide. It’s a flag system rather than a thorough evaluation. A company can get a 12/12 score and still be a terrible place to work. However, a company that doesn’t get at least 10 is effectively guaranteed to be a terrible place to work. Make sure your potential employers get a high score of 11 or 12, and then use your own judgement. Don’t go in blind.</p>

<p><em>P.S. I’ve had this post sitting in my drafts for quite a while. Yesterday Stack Overflow mentioned that they are <a href="https://twitter.com/StackOverflow/status/849352372610584576">asking similar questions of themselves</a>. Since there isn’t a right or wrong answer to this sort of thing (including what I wrote above - it could be totally wrong for you and your situation), I figured I’d get mine out, and hopefully prompt people to start thinking about this so that we can form a better idea as whole industry rather than as a lone developer.</em></p>

<div class="footnotes" role="doc-endnotes">
  <ol>
    <li id="fn:using_outlook" role="doc-endnote">
      <p>It turns out that working on an email client, bugs tend to be found pretty quickly. Who would have guessed that developers, particularly at large companies like Microsoft, would use email quite often? <a href="#fnref:using_outlook" class="reversefootnote" role="doc-backlink">&#8617;</a></p>
    </li>
  </ol>
</div>]]></content><author><name>Dale Myers</name></author><category term="joel test" /><category term="software" /><category term="development" /><summary type="html"><![CDATA[Back in 2013, I took a course on “Software Architecture, Process, and Management”. One of the topics which came up was: How do you rate a development team? It’s not a simple challenge, and to get a full answer would take a considerable investigation and a lengthy report at the end. Thankfully, Joel Spolsky came up with a simple 12 question test to make this process relatively painless, named “The Joel Test”. The test isn’t perfect, and doesn’t claim to be, but what it does give you is a solid basis to work from to find out those last few details.]]></summary></entry><entry><title type="html">Easy Request Response Rules in Fiddler</title><link href="https://myers.io/2016/10/25/easy-request-response-rules-in-fidder/" rel="alternate" type="text/html" title="Easy Request Response Rules in Fiddler" /><published>2016-10-25T12:52:00+01:00</published><updated>2016-10-25T12:52:00+01:00</updated><id>https://myers.io/2016/10/25/easy-request-response-rules-in-fidder</id><content type="html" xml:base="https://myers.io/2016/10/25/easy-request-response-rules-in-fidder/"><![CDATA[<p>Fiddler as a tool has gotten more and more advanced over time. With it’s powerful scripting capabilities, there isn’t much you can’t do with it when dealing with HTTP requests. One of the problems with the scripting interface is the high barrier to entry. Fortunately, for a lot of things, there is an easier way. This post will focus on request response rules due to the fact that I’m often asked about them due my work on add-ins for Office.</p>

<p>Sticking with the Office add-ins example, here is how you can rewrite a call to a script to one you have locally for easy debugging. (If you don’t already have it, you can download Fiddler <a href="http://www.telerik.com/fiddler">here</a>)</p>

<h3 id="setting-up-https-support">Setting up HTTPS Support</h3>

<p>Fiddler should do everything you need out of the box with one minor exception: SSL (or TLS hopefully) requests. In order to make it work with these requests, there is an extra step. Open <code class="language-plaintext highlighter-rouge">Fiddler Options</code> from the <code class="language-plaintext highlighter-rouge">Tools</code> menu, and select the <code class="language-plaintext highlighter-rouge">HTTPS</code> tab. Make sure that the <code class="language-plaintext highlighter-rouge">Decrypt HTTPS traffic</code> box is ticket and click <code class="language-plaintext highlighter-rouge">OK</code>. Fiddler can now intercept your HTTPS traffic and decrypt it. The problem is that you machine will, hopefully, reject these requests due to being <a href="https://en.wikipedia.org/wiki/Man-in-the-middle_attack">Man in the middled</a>. In order to ensure that your device will accept these certificates, the Fiddler certificate needs to be added to your store. This varies from device to device, but the gist of it is you will use the device which is making the connection you want to rewrite part of, browse to <code class="language-plaintext highlighter-rouge">X.X.X.X:8888</code> in your web browser, where <code class="language-plaintext highlighter-rouge">X.X.X.X</code> is the IP address of the machine running Fiddler, and chose to download the <code class="language-plaintext highlighter-rouge">FiddlerRoot certificate</code> towards the bottom of that page. More details about how to handle this for your device or browser can be found <a href="https://www.google.co.uk/webhp?q=fiddler+decrypt+https+on+X#safe=off&amp;q=fiddler+decrypt+https+on+X">here</a>.</p>

<h3 id="setting-the-autoreponder">Setting the AutoReponder</h3>

<p>In the right hand pane, select the <code class="language-plaintext highlighter-rouge">AutoResponder</code> tab at the top. Make sure <code class="language-plaintext highlighter-rouge">Enable rules</code> and <code class="language-plaintext highlighter-rouge">Unmatched requests passthrough</code> are checked. Now, click <code class="language-plaintext highlighter-rouge">Add Rule</code>. At the bottom of the pane you will see a section named <code class="language-plaintext highlighter-rouge">Rule Editor</code>. For the first text field, you are going to enter <code class="language-plaintext highlighter-rouge">EXACT:https://the.url.of/my/script/here.js</code> , then for the bottom field, you have two choices. You can return a local file, or a response.</p>

<p>For the local file, just select <code class="language-plaintext highlighter-rouge">Find a file...</code> in the dropdown, browse to the file you want to return, and select <code class="language-plaintext highlighter-rouge">Open</code>. Then click <code class="language-plaintext highlighter-rouge">Save</code> on the right hand side.</p>

<p>If you want to return a different file hosted somewhere else (maybe a newer version of a script or similar), simple enter the URL of the file in the bottom field, and click <code class="language-plaintext highlighter-rouge">Save</code></p>

<h3 id="next-step">Next Step</h3>

<p>There isn’t one. That’s it. Make sure your device is set to use the machine running Fiddler as a proxy (remember it’s on port 8888), and you are good to go. If it doesn’t work quite as expected, make sure files aren’t being returned from the cache.</p>]]></content><author><name>Dale Myers</name></author><category term="fiddler" /><category term="http" /><category term="web" /><summary type="html"><![CDATA[Fiddler as a tool has gotten more and more advanced over time. With it’s powerful scripting capabilities, there isn’t much you can’t do with it when dealing with HTTP requests. One of the problems with the scripting interface is the high barrier to entry. Fortunately, for a lot of things, there is an easier way. This post will focus on request response rules due to the fact that I’m often asked about them due my work on add-ins for Office.]]></summary></entry></feed>